All other slits
- Start the ALFOSC UIF.
- Move the aperture wheel to the position opposite to the one
you want to exchange.
- Go to the dome floor and open the slit door.
- Loosen the 4 screws in the holder.
- Carefully remove the slit and put it in its box.
- Check the new slit for dust on the slit jaws; blow any dust away with clean air.
- Carefully put in the new slit with the defining side to the top.
- Tighten the 4 screws in the holder with only a tiny amount
of force.
- Update the aperture definition file using the GUI
editor EditSetup.
- Press 'Read Setup' on the UIF.
- Align the slit and set the align-flag
in the aperture definition file using the GUI
editor EditSetup.
- Determine the position of the slit from a full-frame image,
without a filter in the ALFOSC beam. Use the ThAr lamp as light
source, with 0.2 second exposure time.
Use alfosc.edit-slitpos
to update the ~obs/alfosc/slitpos.def file
accordingly. For CCD#8 we usually put the vertical spectrum at
column x=1050.
Note: the align tool (TIASGAT) will report the slit position
when aligning the slit.
| slit | 0.4 | 0.5 | 0.75 | 1.0 | 1.2 | 1.3 | 1.8 | 2.5 | 5.0 | 10.0 |
|---|
| Y-pos (pixel) | 999 | 1000 | 1000 | 1021 | 1007 | 998 | 1028 | 1003 | 1007 | 997 |
|---|
Approximate Y-positions of the default horizontal slits on CCD#8 at X-pos=1050, and for
the current CCD#14 the offsets between the slits should be approximately the same.
The error on the above values, for the telescope at zenith, should be +/- 3
pixels.
This table is only indicative: allways remeasure !
Note: Always check the setup with an halogen and an
arc exposure to see if you have mounted the optical items
correctly!
Mounting/exchanging ALFOSC grisms
- Start the ALFOSC UIF.
- Move the grism wheel to the position
opposite to the one you want to exchange (see notes on balancing below).
- Go to the dome floor and open the access box.
- Loosen the 3 screws in the holder.
- Carefully remove the grism and put it in its box.
- Take the new grism out of its box and check its general
appearance for scratches, bad coatings, dust, etc. Update the
grism status table if
necessary.
- Check the direction of dispersion of the grism: it should be at
right angles with the slit orientation.
- Carefully put in the new grism with the grooves towards the camera.
- For high-res grisms the grooved side is the steep one.
- For low-res grisms look at the grism faces under a shallow angle:
the grooved side is the least reflective one.
- All grisms are marked with an arrow that should point towards the camera, meaning the arrow should point away from the grism wheel (see image below).
- Tighten the 3 screws in the holder with only a tiny amount
of force.
- Update the grism definition file using the GUI
editor EditSetup.
- Press 'Read Setup' on the UIF.
- Align the grism and set the align-flag
in the grism definition file using the GUI
editor EditSetup.

Note: Always check the setup with an halogen and an
arc exposure to see if you have mounted the optical items
correctly!
Echelle-mode remarks
For Echelle mode the cross-dispersing grisms (#10, #11, #12)
are to be mounted in the filter wheel, in a similar fashion as
described above. The cross-dispersing grisms should be mounted with
the dispersion direction vertical.
The cross-dispersing grisms occasionally have to be rotated in
their holder in order to allow for correct mounting in the filter or
grism wheel.
The Echelle grism (#9, #13) has to be mounted with horizontal
dispersion, if used together with a cross disperser.
Note that
grism #13 can be used in the standard long-slit mode, together with a
dedicated order-sorting filter (filter #124) in the ALFOSC filter
wheel. Grism #13 has its mounting holder reversed wrt the other
grisms.
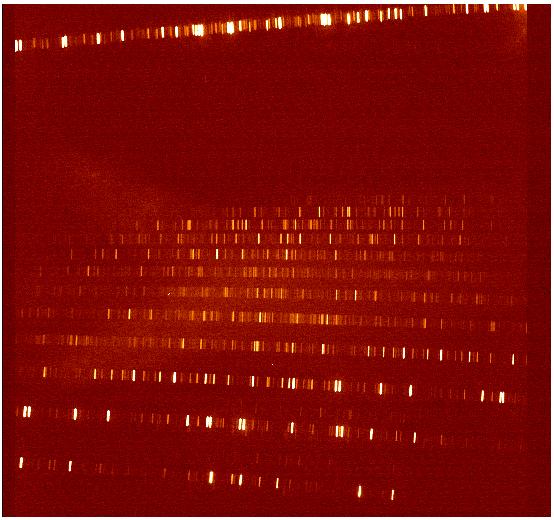
The Echelle slitlets are to be mounted vertically in the aperture
wheel, such that the ThAr lines appear vertically (see example image
below).
The Echelle slits are called Ech_0.7" up to Ech_2.2" in the
setup GUI EditSetup.
Although the Echelle slits do not have to be
aligned, it is important to edit the
center of the slitlet in the ~obs/alfosc/slitpos.def file
(use alfosc.edit-slitpos). The position of slit center (in CCD
pixel coordinates) must be measured from a unbinned full-frame slit
image, without a filter in the ALFOSC beam. Use the ThAr lamp
with 0.2 sec exposure.
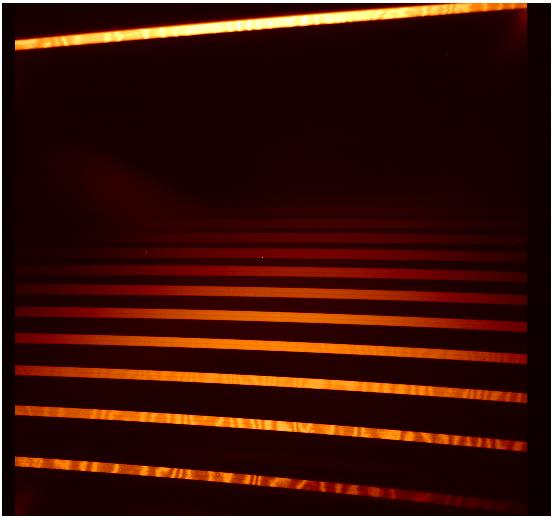
Example calibration images, Halogen (left) and ThAr, for Echelle grism
#9 with grism #11 as cross disperser. At the top of the image, the
zeroth order of the cross-disperser is visible: this order is
discarded in data reduction (i.e. is useless). The useful Echelle
orders run from the middle of the chip (blue) to the bottom
(red).
Note: Always check the setup with an halogen and an
arc exposure to see if you have mounted the optical items
correctly!
VPH grism #17
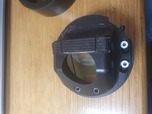
The grism has a different holder than the other grisms. On the holder,
there is an adjustable rotational definer that should not be loosened,
as it currently defines the correct rotational alignment of the grism.
See the image above (click to enlarge), the white screws should be left
tightened.
When mounting grism #17, put in the grism and rotate it anticlockwise
until the rotational definer hits the mounting pin on the wheel. Then
secure the grism with the 3 clamps of the wheel.
The grism can only be mounted in one of the wheel positions that does
not have an extra baffle on the shutter-side of the wheel: this leaves
positiones 1, 2, 6, 7 (Open Lyot). Sofar we have always mounted grism
#17 in position 2.
It does not fit in most positions other than position 2.
The grism can only be mounted horizontally, and the holder fits quite
tightly in the wheel (i only tried wheel position 2 so far). When
mounting the grism, the stepper units in EditSetup should
first be set to -4800 wrt the nominal value of that wheel position.
Nominal values are 0, 40000, 80000, etc. Then the stepper units need
minor adjustment in order to align the grism (see below). This
procedure ensures that the grism, which is mounted offset in its
holder, will be in the center of the ALFOSC beam.
Note that the grism is big and heavy, so please keep wheel balance in
mind.
The associated vertical slits are kept on the
same shelf as the other ALFOSC slits. See also the carrousel.
Aligning grism and slits: the grism/slit can be aligned with
the detector rows/columns, by manually changing the stepper-motor
units by amounts of 50 or so (possibly much more for the slits). Note
that the slit must be aligned with the grism in the beam, using arc
lines.
VPH grisms #18, #19, #20
These grisms are to be mounted as any other grism, but because the
barrels are a bit wider than the normal grisms these VPH grisms only
fit in slots that do not have an extra baffle mounted on the shutter
side of the grism wheel. Dedicated slots are slots 2 and 6, and slot
1 should be available as well. Slot 5 is also dedicated from August
17th 2015 (the baffle on the shutter side was removed for this slot).
Note that these grisms are heavy, so please keep wheel balance in
mind.
Note that these grisms consist of optical components that are stuck
together with oil, rather than optical cement/glue.
Be extra careful
when handling them and when placing and storing them.
Balancing the grism wheel
Everyone tells us that we have to balance the grism wheel, in order to
avoid grism wheel timeouts.
This requires that we know the weights of all items, including the
focus pyramid and the Lyot stop.
See the table below, which list the
weights of the items including that of their holders.
| grism | weight (gram) |
|---|
| Gr#3 | 100 |
| Gr#4 | 105 |
| Gr#5 | 110 |
| Gr#6 | 110 |
| Gr#7 | 120 |
| Gr#8 | 165 |
| Gr#9 | 160 |
| Gr#10 | 105 |
| Gr#11 | 110 |
| Gr#12 | 105 |
| Gr#13 | 150 |
| Gr#14 | 110 |
| Gr#15 | 100 |
| Gr#16 | 120 |
| Gr#17 | 230 |
| Gr#18 | ~160 |
| Gr#19 | ~160 |
| Gr#20 | ~160 |
| Focus Pyramide | 90 |
| Open Lyot | 100 |
| WeDoWo | 110 |
Furthermore, wheel positions 0 (Focus-Pyr), 3, 4, all have an
extra baffle mounted on the shutter-side of the wheel, which weigh 35
grams each.