HiRAC / BIAS Quick Reference
Introduction
Common for both modes of operation is the use of the Loral 2k CCD camera which is controlled with a program called The BIAS control system
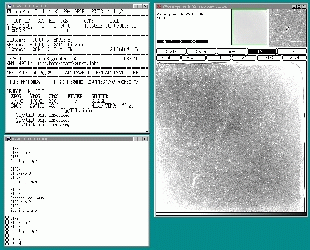
Note that pixel (1,1) is in the lower left corner. When the mouse cursor is in the image, the intensity shown (besides the x,y value) is scaled back to almost true values from the given highcut and lowcut. A manualpage for SAOimage is available by typing man saoimage. This SAOimage is controlled by the Status window
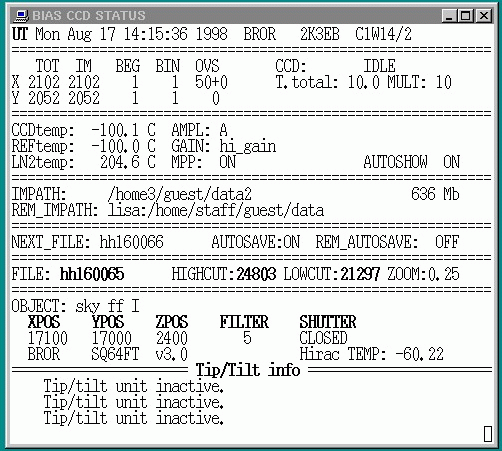
The first line gives information about date, time and CCD controller identifier.
Filter control
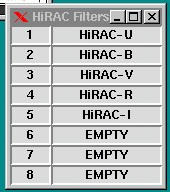
The current filter number is shown in the lower part of the status window. A small window is displayed in the lower right corner of the screen. This shows which filters are mounted in which positions. This window looks like this:
The filter is changed by giving the command "filter nn" at the
The .biasrc file
KEYWORD VALUE An example is shown beneath
STARTUP OFF Keywords are:
Directories and files
The automatic filenaming mechanism gives you a default filename with the following meaning:
d j 2 3 0 0 2 5
These filenames can be overridden, if your filename has a letter
for the first character, and ends with 4 digits. If a file of
the same name already exists
when the program is saving data, it is not overwritten,
but the next free number is used (this might be confusing if you delete
some files and start over again). The default filenames are MS-DOS
compatible. Backup/storage of images
The observers are responsible for deleting the data from previous nights. FITS headers
Shown below is the FITS header attached to all the files:
        TELESCOP=  'NOT            '    /
	INSTRUME=  'BROCAM2  T/T '      /
	DETNAME =  'LORAL 2k x 2k'      /
	DATE    =  '16-08-98'           /
	FILENAME=  'hh160001'           /
	OBJECT  = 'bias                '/
	EXPTIME =                0.000  /
	TM_START=                69652  /  19:20:52          UT start time
	TM_END  =                69737  /  19:22:17          UT end time
	CRVAL1  =                    1  /
	CRPIX1  =                    1  /
	CDELT1  =                    1  /
	CRVAL2  =                    1  /
	CRPIX2  =                    1  /
	CDELT2  =                    1  /
	COMMENT =
	COMMENT = ''
	GAINM   =    'HIGH'             /  High or Low
	AMPLM   =    'A '               /  A / B or AB
	CCDTEMP =               -100.1  /
	LN2TEMP =                224.6  /
	COMMENT = ''
	MPP     =                    1  /
	CHIPID  =     '2K3EB  C1W14/2  '/
	DATAMIN =     '     389'        /
	DATAMAX =     '     423'        /
	XOVERSC =     '      50'        /
	YOVERSC =     '       0'        /
	AOVERSC =     '       0'        /
	FILTERNO=      '4'              /
	FILTER  =      'HiRAC-R'        /
	  .
	  .
	  .
	  .

	ST      =          15:51:11.70  / Siderial time at start
	RA      =       237.4520044459  / Right ascention at start (15h:49m:48.48s)
	DEC     =        28.9181866445  / Declination at start ( 28d:55m:5.5s)
	AIRMAS  =         1.0000088064  / Airmass at start (sec(z))
	FIELD   =                90.00  / Field rotation at start
	FOC     =                22078  / Telescope focus at start
	  .
	  .
	  .
        END
Printable version of the commands. |
| help | Print the BIAS help page. | ||||||||||||||||||||||||||||
|---|---|---|---|---|---|---|---|---|---|---|---|---|---|---|---|---|---|---|---|---|---|---|---|---|---|---|---|---|---|
| quit | Exit BIAS. ( alias 'exit' ). | ||||||||||||||||||||||||||||
| exp [ttt.t] | Normal expose for 'ttt.t' sec. | ||||||||||||||||||||||||||||
| mexp [ttt [nnn]] | nnn multiple exposures of time ttt. | ||||||||||||||||||||||||||||
| dark [ttt] | Dark exposure for 'ttt' sec. | ||||||||||||||||||||||||||||
| mdark [ttt [nnn]] | nnn multiple dark exposures of time ttt. | ||||||||||||||||||||||||||||
| focus [focus startvalue] [focus stepsize ] [ttt] | Start a focus sequence, each exp. of ttt sec. First image at "focus startvalue" and focus will be incremented be "focus stepsize". | ||||||||||||||||||||||||||||
| abort | Stop an ongoing integration or readout. | ||||||||||||||||||||||||||||
| readout | Reads out the ccd. Use 'abort' first to stop the exposure. | ||||||||||||||||||||||||||||
| addtime ttt | Adds ttt seconds to an integration. 'ttt' can be negative, if the resulting remaining integration time is < 0, the integration is stopped and the ccd is read out. | ||||||||||||||||||||||||||||
| hold | Hold an ongoing integration (close shutter and stop the integration timer). | ||||||||||||||||||||||||||||
| resume | Resume an integration (open shutter and restart the integration timer). | ||||||||||||||||||||||||||||
| save | Save the image in next filename. | ||||||||||||||||||||||||||||
| tint [ ttt.t ] | set default integration time in sec. | ||||||||||||||||||||||||||||
| mult [ nnn ] | set default no. of multiple integrations. | ||||||||||||||||||||||||||||
| xbeg [ nnn ] | set start x value of CCD readout. | ||||||||||||||||||||||||||||
| ybeg [ nnn ] | set start y value of CCD readout. | ||||||||||||||||||||||||||||
| xsize [ nnn ] | set x size in true pixel value. | ||||||||||||||||||||||||||||
| ysize [ nnn ] | set y size in true pixel value. | ||||||||||||||||||||||||||||
| xbin [ nn ] | set x-binning. | ||||||||||||||||||||||||||||
| ybin [ nn ] | set y-binning. | ||||||||||||||||||||||||||||
| bin [ nn ] | set x and y-binning. | ||||||||||||||||||||||||||||
| resetxy | reset the CCD geometry values to defaults. | ||||||||||||||||||||||||||||
| gainh, gainl | Set gain high or low. Normal operation mode is 'highgain' which gives a readout speed of ~70 sec. for a full frame. 'Gainlow' gives a readout speed of ~45 sec. The conversion factor is different in the two modes. | ||||||||||||||||||||||||||||
| mpp+, mpp- | Set MPP mode on or off. | ||||||||||||||||||||||||||||
| autosave+ | Turn on automatic saving of images on local disk. | ||||||||||||||||||||||||||||
| autosave- | Turn off automatic saving of images on local disk. | ||||||||||||||||||||||||||||
| remsave+ | Turn on saving on remote disk. The remote work station and path must be defined in '.biasrc'. | ||||||||||||||||||||||||||||
| remsave- | Turn off saving on remote machine. | ||||||||||||||||||||||||||||
| impath [ path ] | Change the default image directory. Use with care. | ||||||||||||||||||||||||||||
| rempath [ path ] | Set path on remote machine. | ||||||||||||||||||||||||||||
| remsystem system | Set the remote system ( Unix machine ). | ||||||||||||||||||||||||||||
| filename [ name ] | Specify the output file names, the length <= 8 char, 1. char must be a letter, last 4 must be numbers. (Be careful about this, as the last filename may automatically be updated in '.biasrc'.) | ||||||||||||||||||||||||||||
| autoshow+ | Show images in SAOImage. | ||||||||||||||||||||||||||||
| autoshow- | Do not show images in SAOImage. | ||||||||||||||||||||||||||||
| ls | Unix list 'ls' command in impath directory. | ||||||||||||||||||||||||||||
| ll | Unix list 'ls -l' command in impath directory. | ||||||||||||||||||||||||||||
| imexamine | Start an Iraf-like imex, valid 'imex' commands are:
|
||||||||||||||||||||||||||||
| imexbox [ nn ] | Define the 'aperture' box for surface- and contour plots. | ||||||||||||||||||||||||||||
| aperture [ nn ] | Set the size of the aperture used in 'imexamine'. The size is adjusted to an uneven value. | ||||||||||||||||||||||||||||
| magzero [ zz.z ] | Set the magnitude offset for magnitude calculation in the 'imexamine' 'a' function. The value can be fixed at startup in the .biasrc file. | ||||||||||||||||||||||||||||
| disp [filename] | Display an image from disk in SAOImage. ( alias 'ld' ). | ||||||||||||||||||||||||||||
| seth [ nnn ] | Set highcut for displayed image. ( alias 'z2' ). | ||||||||||||||||||||||||||||
| setl [ nnn ] | Set lowcut for displayed image. ( alias 'z1' ). | ||||||||||||||||||||||||||||
| z+, z- | Zoom in or out, this works independently of SAOImage. If you zoom with SAOImage buttons, the displayed value in the status window is notupdated. | ||||||||||||||||||||||||||||
| object [text] | Specify an object name for the FITS header. Max. 20 char. The text is saved until changed. | ||||||||||||||||||||||||||||
| comment [text] | Comments to put in FITS header. Max. 40 char. The text is cleared after storing in the FITS header. | ||||||||||||||||||||||||||||
| comment1 [text] | Extra comment field to put in FITS header. Not cleared after use. | ||||||||||||||||||||||||||||
| head | View the current FITS file header. Use 'q' to quit. | ||||||||||||||||||||||||||||
| logon | Start a log of your command screen. Default on. | ||||||||||||||||||||||||||||
| logoff | Stop the log. | ||||||||||||||||||||||||||||
| !xxxxxx | Execute the Unix command 'xxxxxx'. | ||||||||||||||||||||||||||||
| saoimage | Restart SAOImage. | ||||||||||||||||||||||||||||
| Miscellaneous commands | : | ||||||||||||||||||||||||||||
| sleep nn | Wait for nn seconds. (For use in batch routines). | ||||||||||||||||||||||||||||
| wait | Wait for key press. | ||||||||||||||||||||||||||||
| rbias | Re-read the '.biasrc'. | ||||||||||||||||||||||||||||
| stat | Ask if camera is Busy or Ready. Answers 'B' or 'R'. | ||||||||||||||||||||||||||||
| run filename | Run a batch with commands (any command except 'run'). | ||||||||||||||||||||||||||||
| xrun command boxsize | Goes into SAOImage, when Return or Space is hit, the box is saved in a textfile 'command.data'. The command is then run in an xterm window. | ||||||||||||||||||||||||||||
| guide | Start the tip/tilt fast guiding facility. | ||||||||||||||||||||||||||||
| sguide | Stop the tip/tilt module. | ||||||||||||||||||||||||||||
| hfast | Make a indefinite sequence of images with the HiRAC guidecamera. the images are not saved to disk. | ||||||||||||||||||||||||||||
| habort | Aborts the actions of the 'hfast' command. | ||||||||||||||||||||||||||||
| ttinit | Initializes the x, y, z, filter and shutter of HiRAC. | ||||||||||||||||||||||||||||
| xinit | Initializes the x movement of HiRAC. 'yinit', 'zinit', 'finit' and 'sinit' initializes the y movement, z movement, the filter and the shutter. | ||||||||||||||||||||||||||||
| xgo [nnnnn] | Moves the x motion of the HiRAC guideprobe to position nnnnn (stepvalue). Range is [0..33000]. All of the x,y,z motions has limit switches to avoid mechanical collision. | ||||||||||||||||||||||||||||
| ygo [nnnnn] | Moves the y motion of the HiRAC guideprobe as above. | ||||||||||||||||||||||||||||
| zgo [nnnn] | Moves the focus of the HiRAC guidecamera to position nnnn (stepvalue). Range is [0..4400]. | ||||||||||||||||||||||||||||
| telguide+ | Turn on autocorrection of telescope when guidestar is drifting out of the T/T stroke range. | ||||||||||||||||||||||||||||
| telguide- | Turn off the autocorrection of the telescope. | ||||||||||||||||||||||||||||
| sopen | Direct command to open the shutter. TECH USE ONLY! | ||||||||||||||||||||||||||||
| sclose | Direct command to close the shutter. TECH USE ONLY! | ||||||||||||||||||||||||||||
| sexp [nn] | Direct command which opens the shutter for nn seconds and then closes it again. This command has nothing to do with the camera. DO NOT use it for anything else that experiments! It is intended for use when making star trails on the science CCD. |
Using the tip/tilt system
- Connect the cooling pump for the guide camera. This involves
mounting the cooling pump base the the coold block in the
service hole for the az motor and connecting and turning on
the power to the cooling pump.
- Turn on the power supply for the peletier cooler in the guide
camera. Current should be ~2amps, voltage ~10V. Ideally the
camera should be pumped before doing this.
- Before starting HiRAC BIAS, download code to the guide camera. Give the UNIX command 'cd ~hirac/aux-files' followed by 'bterm540'. Now press 'PgUp' to download and Ctrl-e when finished (BBBBB-s are printed).
Preparing HiRAC (Staff only)
Aquiring a guide star
-
Take a snapshoot of the field. You can bin 2 by 2 for faster readout.
Enter 'imexamine' mode, put the cursor on the preferred star. Press
'g' this gives the estimated probe coordinates. Press 'p' if you
are happy with this. The guide probe will now be preset to this star.
Starting and stopping guiding
-
Guiding is started by the command 'guide'. When guiding is on,
the flux in the four quadrants are shown in the status display
as Flx1, Flx2, Flx3 and Flx4. for proper guiding these should be
at least 100 on average. Changing the guiding frequency will change
the flux. Also shown are the requested T/T position (Tx and Ty).
These should be around 1500-2000 on average. If Tx or Ty stays at 0
or 4096, the T/T module is in the limit. This is usually caused by
a badly centered guide star (see the 'telguide' command).
The guiding is stopped by the command 'sguide'.
Setting the guide frequency
-
The guide frequency is set by using the commmand 'hfreq nnn' while not
guiding, where nnn is the guide frequency. Frequencies lower than
15Hz will not give significant improvements. The frequency may be
increased until the average quadrant flux is in the range 100-300
or the frequency reaches 50Hz.
The 'telguide' command
-
If the guide star is not properly centered (Tx or Ty in limit), this
may be acomplished by using the 'telguide command'. By issuing the
command 'telguide+' the telescope guideprobe is gradually moved such
that the guide star will be centered in the HiRAC guide probe. This
can also be used to take up small offsets between filters.
Automatic guide frequency
-
By giving the command %ATEX1 in
The feature can be disabled by typing %ATEX0.
For many targets, where the guidestar is faint, it may be desirable to use a lower flux and a higher frequency, preventing the effective use of this command (improvements to software are planned).
Automatic gain adjustment
-
To be added later.
Observing with HiRAC
- On the TCS console, give the command foc-man.
- Give the
BIAS command 'focus nnnnn mm tt', where
'nnnnn' is the start value of the telescope focus,
'mm' is the amount to change the telescope focus between sub-exposures,
'tt' is the exposure time for each of the sub-exposures.
- When the image is fully read out, type imexa.
- Place the cursor over each of the stellar images, pressing the 'a' key on the keyboard. Note the value for the FWHM and the ellipticity.
- When the stellar image with the smallest FWHM and ellipticity has been found, the focus value associated with that image is the correct focus value.
- On the TCS console, give the command foc-pos nnnnn, there 'nnnnn' is the correct focus value.
- On the TCS colsole, give the command foc-aut.
Focusing the telescope from BIAS
Focusing the telescope is acheived by making a focus sequence.
When using HiRAC, this is done with the
Offsetting the telescope from BIAS or
how to make mosaic images
A special command to offset the telescope is available in Of course, this feature has always been available in the TCS, but now it is possible to use the teloffset command from a
The teloffset command offsets the telescope in such a way that the CCD image field-of-view is shifted in either the pixel X or Y direction. This means that if the field is set to give RA and DEC along the CCD X and Y direction, then the resulting telescope offset will be in RA and DEC. But when the field angle is different the teloffset command will compensate for this and move the CCD FOV as decribed above.
On the NOT WWW, a form for creating the appropriate
| Back to top | Last modified: April 19 2023 |


