Leak testing NOTCam
 
This test will normally be done after NOTCam has been opened and has just been closed ready for pumping and cooling.

Equipment required to do a leak test:
  1. Residual Gas Analyzer  (RGA)
  2. RGA manual
  3. RGA RS-232 cable
  4. Helium 99.9% (half size bottle)
  5. NEC laptop
  6. Vacuum pump

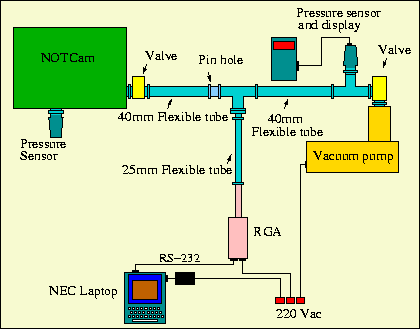
The RGA is usually stored in the clean room on the lower shelf with the T-piece and pin hole already attatched. The RS-232 and power cables should also be still connect to the RGA. The NEC laptop can normally be found on the floor of the service building staff office in its black cloth bag.

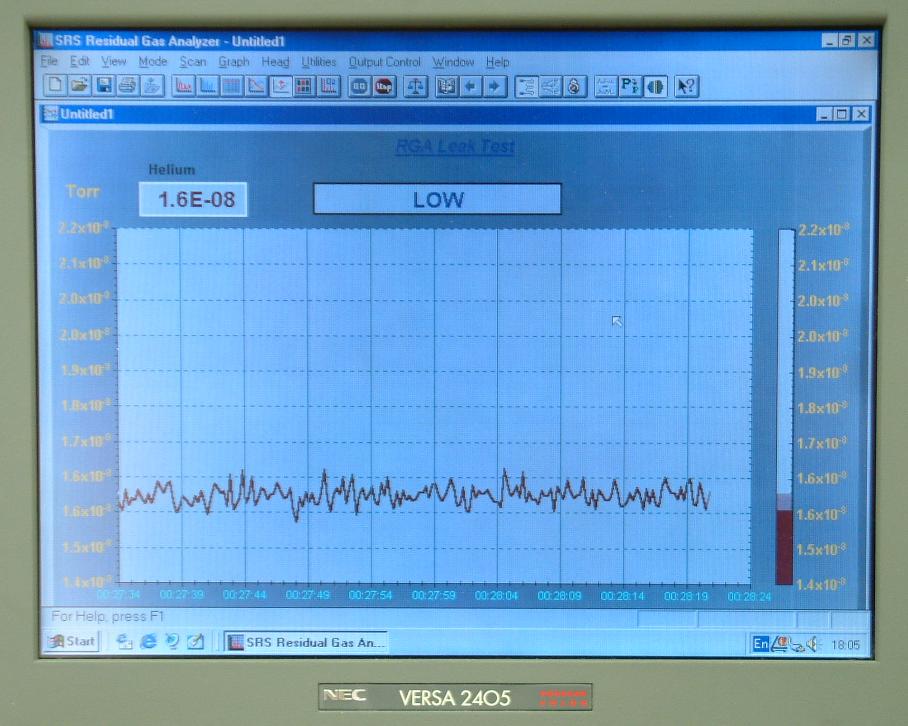
After closing NOTCam it is necessary to pump the instrument for a while. A period of one hour should normally be sufficent, this will allow the pump to reach its maximum normal operating speed of 75Krpm and a pressure in the instrument of about 8x10⁻² mbars. Once these conditions are met you can proceed with the leak test.

 
Schematic of Leak Test Setup
  1. Close the NOTCam valve, close the pump valve and switch off the pump.
  2. Connect the apparatus as show in the schematic diagram by seperating the flexible tubes in the middle and inserting the RGA making sure the pin hole is towards NOTCam. Note, The RGA needs a vacuum of better than 10-4 mbar to work but it is impossible to get such a vacuum with NOTCam when it is warm. The pin hole provides a means of getting a low vacuum for the RGA without having an equal one in NOTCam.
  3. Open the valve on the vacuum pump and start the pump. The pump should go rapidily to it normal operating speed of 75Krpm.
  4. Leaving the pump running until you see a pressure of better than 10-4 mbar on the display, then open the instrument valve slowly and monitor the pump speed. The pump may slow down, this is ok but if it falls to only 10Krpm or less then something is wrong with the connections to the instrument or NOTCam never had or has lost its vacuum. Close the instrument valve!
  5. You now need to wait until the pressure in the RGA returns to its required of < 10-4 mbar as shown on the display.
  6. While waiting for the vacuums to return, power on the PC and start the RGA program by clicking on the SRS RGA program icon on the desktop. It may be useful to refer to the RGA manual when using the instrument.

RGA Program with Leak Test Running
  1. Switch on the RGA, switch at rear of head, and check the power light comes on and its cooling fan starts.
  2. From the RGA program click on the toolbar's RS-232 Setup Button (second from right) and from the pop up window click Connect.

      Baud Rate  28800
      Parity  None
      Data bits  8
      Stop Bits  2
      Com Port  COM1

    The connection is made when the dialog box disappears, the toolbar's GO button turns green, the RS-232 button is highlighted, and the Scan and Head menu commands get enabled.
  3. From the toolbar click on the Filament button to turn it on.
  4. From the RGA program Mode menu select Leak Test or CRTL-L.
  5. From the RGA program click on the GO icon and the trace should start up dating with a level indication of Extremly Low or Low and a figure of about 2x10⁻⁸ as the He level.
  6. From the Graph menu select Auto Scale or CRTL-K.
  7. Make sure there are no errors with the RGA by checking that the red Error LED on the rear of the RGA is not lite.
  8. The helium bottle is normally stored in the mechanical workshop near the door to the electronics workshop and has a pressure reduction valve fitted and a long clear plastic hose attached, see photograph.

  Pressure reduction valve on helium bottle
  1. Check that the output valve is closed,  lower control under gauges, then open the main valve on top of the bottle. You should see a pressure of up to 200bar on the lefthand gauge and virtually nothing on the other. Open the output, slowly until you get a good but not too high a flow of helium.
  2. Move around NOTCam applying the He to the large O-ring seal, the window and all the connectors underneath while watching the level on the monitor. It is possibly easier for two to do this, one looking at the laptop while the works the He.
If no significant increase in the leak level occurs (stays below 10-8 ) then no leaks exist. Some He will always find its way into the instrument so small increases in He detection will be expected.

After making the tests
  1. Turn off the RGA filament by clicking of the Filament button.
  2. Turn off the RGA trace by clicking the Stop button.
  3. Switch off the RGA head.
  4. Exit the RGA program from the File menu, don't bother saving anything.
  5. Close the NOTCam valve then the vacuum pump valve.
  6. Switch off the vacuum pump.
  7. Remove the RGA from the vacuum circuit and connect the two flexible tubes together again, so the pump is now connected directly with the instrument.
  8. Open the pump valve and start the pump.
  9. Wait about 15 minutes for a good vacuum to be reach in the tubes before opening the NOTCam valve.