NOTCam CookbookLast updated December 06 2023
Please refer to the online version for the latest update
Table of Contents
Dithering patterns Readout modes Overheads Pointing scripts Instrument setup scripts OB generated scripts
Start of the night (30 min before sunset!)
Field rotator and Camera probe Sky flats Autoguiding Autoguiding - NOTCam special cases Telescope focus
Closing Down Procedure Data saving and retrieval Compensation for override observations
Preparing NOTCam ObservationsWe refer to the more extensive NOTCam User's Guide about NOTCam in general, and imaging in particular, and for spectroscopy we refer to the NOTCam spectroscopy web pages. Exposure Time CalculatorYou need to determine the total on-source integration time needed to reach your required S/N ratio. Use the Exposure Time Calculator (ETC) , and note that it allows multiple exposures, as well as peak value estimates (useful to indicate linear range and saturation levels, but this depends critically on the seeing). The total time needed is typically spread out on many sky positions in order to allow an accurate subtraction of the sky background. For imaging it is recommended to stay at most 1-2 minutes per sky position (in warm summer weather 30-40s for the K band). Depending on the accuracy you need, you probably want (target + sky) to be within the linear range of the detector (i.e. < 25000 adu, though the non-linearity can be corrected for, see NOTCam calibrations), and for very bright sources you may also select to use one of the small stops. The background is high and variable, and for deep broad-band imaging (especially H and K) this may become the limiting factor regarding how long individual exposure time you can use. Otherwise the limiting factor is the peak value of the target. Both the seeing and the sky-background varies from night to night and within the night. Note that you can play around with different seeing values using the ETC, but the sky background it uses is fixed to typical values. In visitor mode you can make test exposures and modify your scripts on-the-fly, and in service mode you can ask that the observer makes sure a given target or background is staying within a given limiting value. Dithering patternsDecide what dithering pattern and dithering step size you will use. This depends on the spatial extent of your source. Ideally it is recommended to dither at least 10 times the FWHM of the objects. For point sources about 5-15" is typically used. The dithered target fields are used to estimate the sky (and dithering is also essential to get rid of bad pixel areas). In spectroscopy it is normal to dither along the slit, and a frequently used pattern is the so-called ABBA with a step size between A and B that is big enough for the spatial extent of the source. For slightly extended objects it is sufficient to increase the step size somewhat, while for more extended objects it is necessary to measure the sky completely OFF the target (this is called beam-switching), both for imaging and spectroscopy.
You may use our available NOTCam Sequencer Scripts, which are executed from a sequencer window and accessible from any directory. Alternatively, prepare your scripts using the OB generator, which also gives you an estimate of the overheads. The OB generator lets you upload your scripts to the data acquisition computer in directory ~obs/scripts/proposal-ID where proposal-ID refers to your proposal ID which you must enter in the web form (e.g. 42-024). If the directory does not exist, it will be created. You may also copy template scripts to your own directory if you wish to modify these. Make the directory (mkdir) if it does not exist and within this directory type cp ~staff/notcam.script my.script. Scripts are executed from the sequencer window, from the directory where they are placed. Note that if you are saving scripts or files elsewhere in the ~obs account, the directory will be cleaned up after every run and it will not be possible to recover them. Readout ModesDecide whether you will use the reset-read-read or ramp-sampling readout mode, and which exposure times you want per dither position. If you need short exposures, for instance to stay within the linear range of the array, the reset-read-read mode (exp, mexp) must be used. The ramp-sampling mode (frame) usually gives a lower noise and less overheads, and is preferred whenever longer exposures are possible. In imaging mode it is recommended to stay only 1-2 minutes per sky position before dithering. How long exposures you can make depends on the background (notably for broad band imaging), your target, and potential bright stars in the field that can saturate and give nasty memory effects. These considerations depend on what you wish to do. With a seeing of 0.6'' a 9.5 mag star saturates in 6 seconds with the WF camera. Check the 2MASS database, for instance through SIMBAD, which is also useful to make NIR finding charts. The saturation issue is important if you need good photometric accuracy and may lead you to use shorter individual exposure times than originally planned. This has consequences for the choice of readout mode and the resulting overhead factor. If strong saturation is inevitable, and these pixels may affect your target, it is recommended to clear the array a couple of times after each integration. Each such clear command takes 3.5 seconds. OB generatorAll the above considerations must be taken to construct your observing blocks (OBs), which is the standard observing mode now, even in visitor mode. Create your OBs via the OB generator and complete OB scripts are generated to be executed by the observer. These scripts combine telescope pointing, instrument setup, and observing scripts in one go. The OB compiler for NOTCam is complete for imaging mode. You may also use the OB generator for spectroscopy, but the compiled scripts are semi-automatic only, and after pointing to target and setting all FITS headers correctly, the observer is required to run the appropriate scripts for slit acquisition, dithered exposures, and lamp calibration exposures manually. This is described under the Spectroscopy section in this Cookbook. In addition to coordinates, epoch, possible proper motion and finding chart, you can specify the desired orientation on the sky, which apart from default (DEF) for imaging, can be on the parallactic angle (PA) or any given position angle on the sky to be entered in degrees. Note that it is important to select your guide field area, which depends on your dithering step size (read instructions on the web form and for more details consult section Autoguiding below). OverheadsAn estimate of the overheads is needed already at the proposal writing stage. Because of the many short exposures typically used in the infrared, overheads is an issue. NOTCam overheads are dominated by the relatively long readout time of 3.6 seconds. See Overheads at the NOT for an overview. In order to estimate how overheads (due to readout, file storage and dithering) depend on the readout mode selected and their parameters t and N, you can use the Overheads estimator. Also the OB generator, outputs the execution time for a given block. The exposure time is t x N seconds for the ramp-sampling mode (frame t N) and only t seconds in the case of the reset-read-read mode (mexp t N). In addition to the observing overheads calculated in the above step (i.e. to readout, telescope dither, and file storage), one must add the overheads to target acquisition: 3 minutes per target for imaging and 5 minutes per target for spectroscopy, also for any standards (e.g. telluric standards in spectroscopy). Check the NOT Standard Star Catalogues or the IR reference info for info about standard stars etc. For spectroscopy you also need to add the overheads related to taking calibration lamps. This is done in-situ for each target (due to flexure) and involves closing the telescope mirror cover, because of the calibration unit is situated inside the baffle cover. This means 2 minutes overhead to closing/opening plus the actual calibration lamp exposures and readouts. See also recommended calibration lamp exposure times. For WF-cam spectroscopy in the J, H or K band the total time for wavelength calibration is typically 3.5 minutes. Manual observing without OB scriptsIn case you are not using the OB generator, you can make pointing scripts using the old pointing script generator. Target acquisition with NOTCam is made easy and speeded up substantially by preparing OBs/scripts in advance, especially for spectroscopic mode, beam-switching and/or when another orientation than the default one (which for NOTCam is East up and North right!) is wanted. If you do not prepare OBs, nor pointing scripts, then you can submit a TCS Target Catalogue via the web. You may load several catalogues in the same buffer on the TCS by typing on the TCS User Interface read name, where name is the name of your submitted catalogue, or any of the following potentially useful catalogues:
In case you are not using OB generated scripts, the instrument setup scripts notcam.setup-ima and notcam.setup-spec for imaging and spectroscopy mode, respectively, are recommended for changing filters/cameras etc. because they also apply the corresponding focus-offsets automatically. For all NOTCam scripts you can type the command without parameters to get info on the usage, such as for instance: [obs@selena][NOTCAM]$ notcam.setup-ima
Error in arguments
Usage: notcam.setup-ima cam fid

       cam = camera (wf, hr)
       fid = filter ID number (see below)

Z  = 237
Y  = 236    Yn        = 222
            He-IA     = 213   Pa-Gamma  = 214
J  = 201    Jcnt1.207 = 215   Pa-Beta   = 216
H  = 203    Hcnt1.574 = 211
            CH4-s     = 223   CH4-l     = 224
            [FeII]    = 212   [FeII]cnt = 228
Ks = 207    He-IB     = 217   H2-2.121  = 218
            H2cnt     = 230   Br-Gamma  = 209
K  = 208    He-IC     = 219   H2-2.251  = 220
            Kcnt2.267 = 210   CO-(2-0)  = 221
Kp = 206
Afternoon PreparationsLoading the TCS Target Catalogue
TCS access codeAny instrument computer which needs access to the TCS, for instance to move the telescope during slit acquisition or dithering, will ask for the current TCS access code at start-up. This code is updated every day (around lunch time). When you are asked to supply the TCS access code, do the following:
Starting the NOTCam observing systemIMPORTANT INFORMATION: From December 27, 2018, the NOTCam observing system is running on the computer 'selena' and not 'marissa'. Every reference to 'marissa' should be to 'selena'.
CalibrationsIf the detector has been idle for a while it is always recommended to clean accumulated charge by reading out the array a couple of times. This can be done in any of the following ways:
[obs@selena][NOTCAM]$ notcam.clear [obs@selena][NOTCAM]$ notcam.dark 0 [obs@selena][NOTCAM]$ notcam.clean3 where the latter is a combination of 3 times clear and one dark 0 to show the result. Repeat until the dark looks normal. Examples of how darks of 0 and 42 seconds integration time look like are found on the page NOTCam calibrations. DarksThe NOTCam darks are poorly understood, see the NOTCam User's Guide for a comment. By using differential flats and sky-subtraction, the dark is automatically subtracted out, and you should not need to take darks for broad-band imaging. Darks are useful to estimate hot pixels, however, which vary with exposure time. Take darks with the same exposure time and readout mode as your observations.
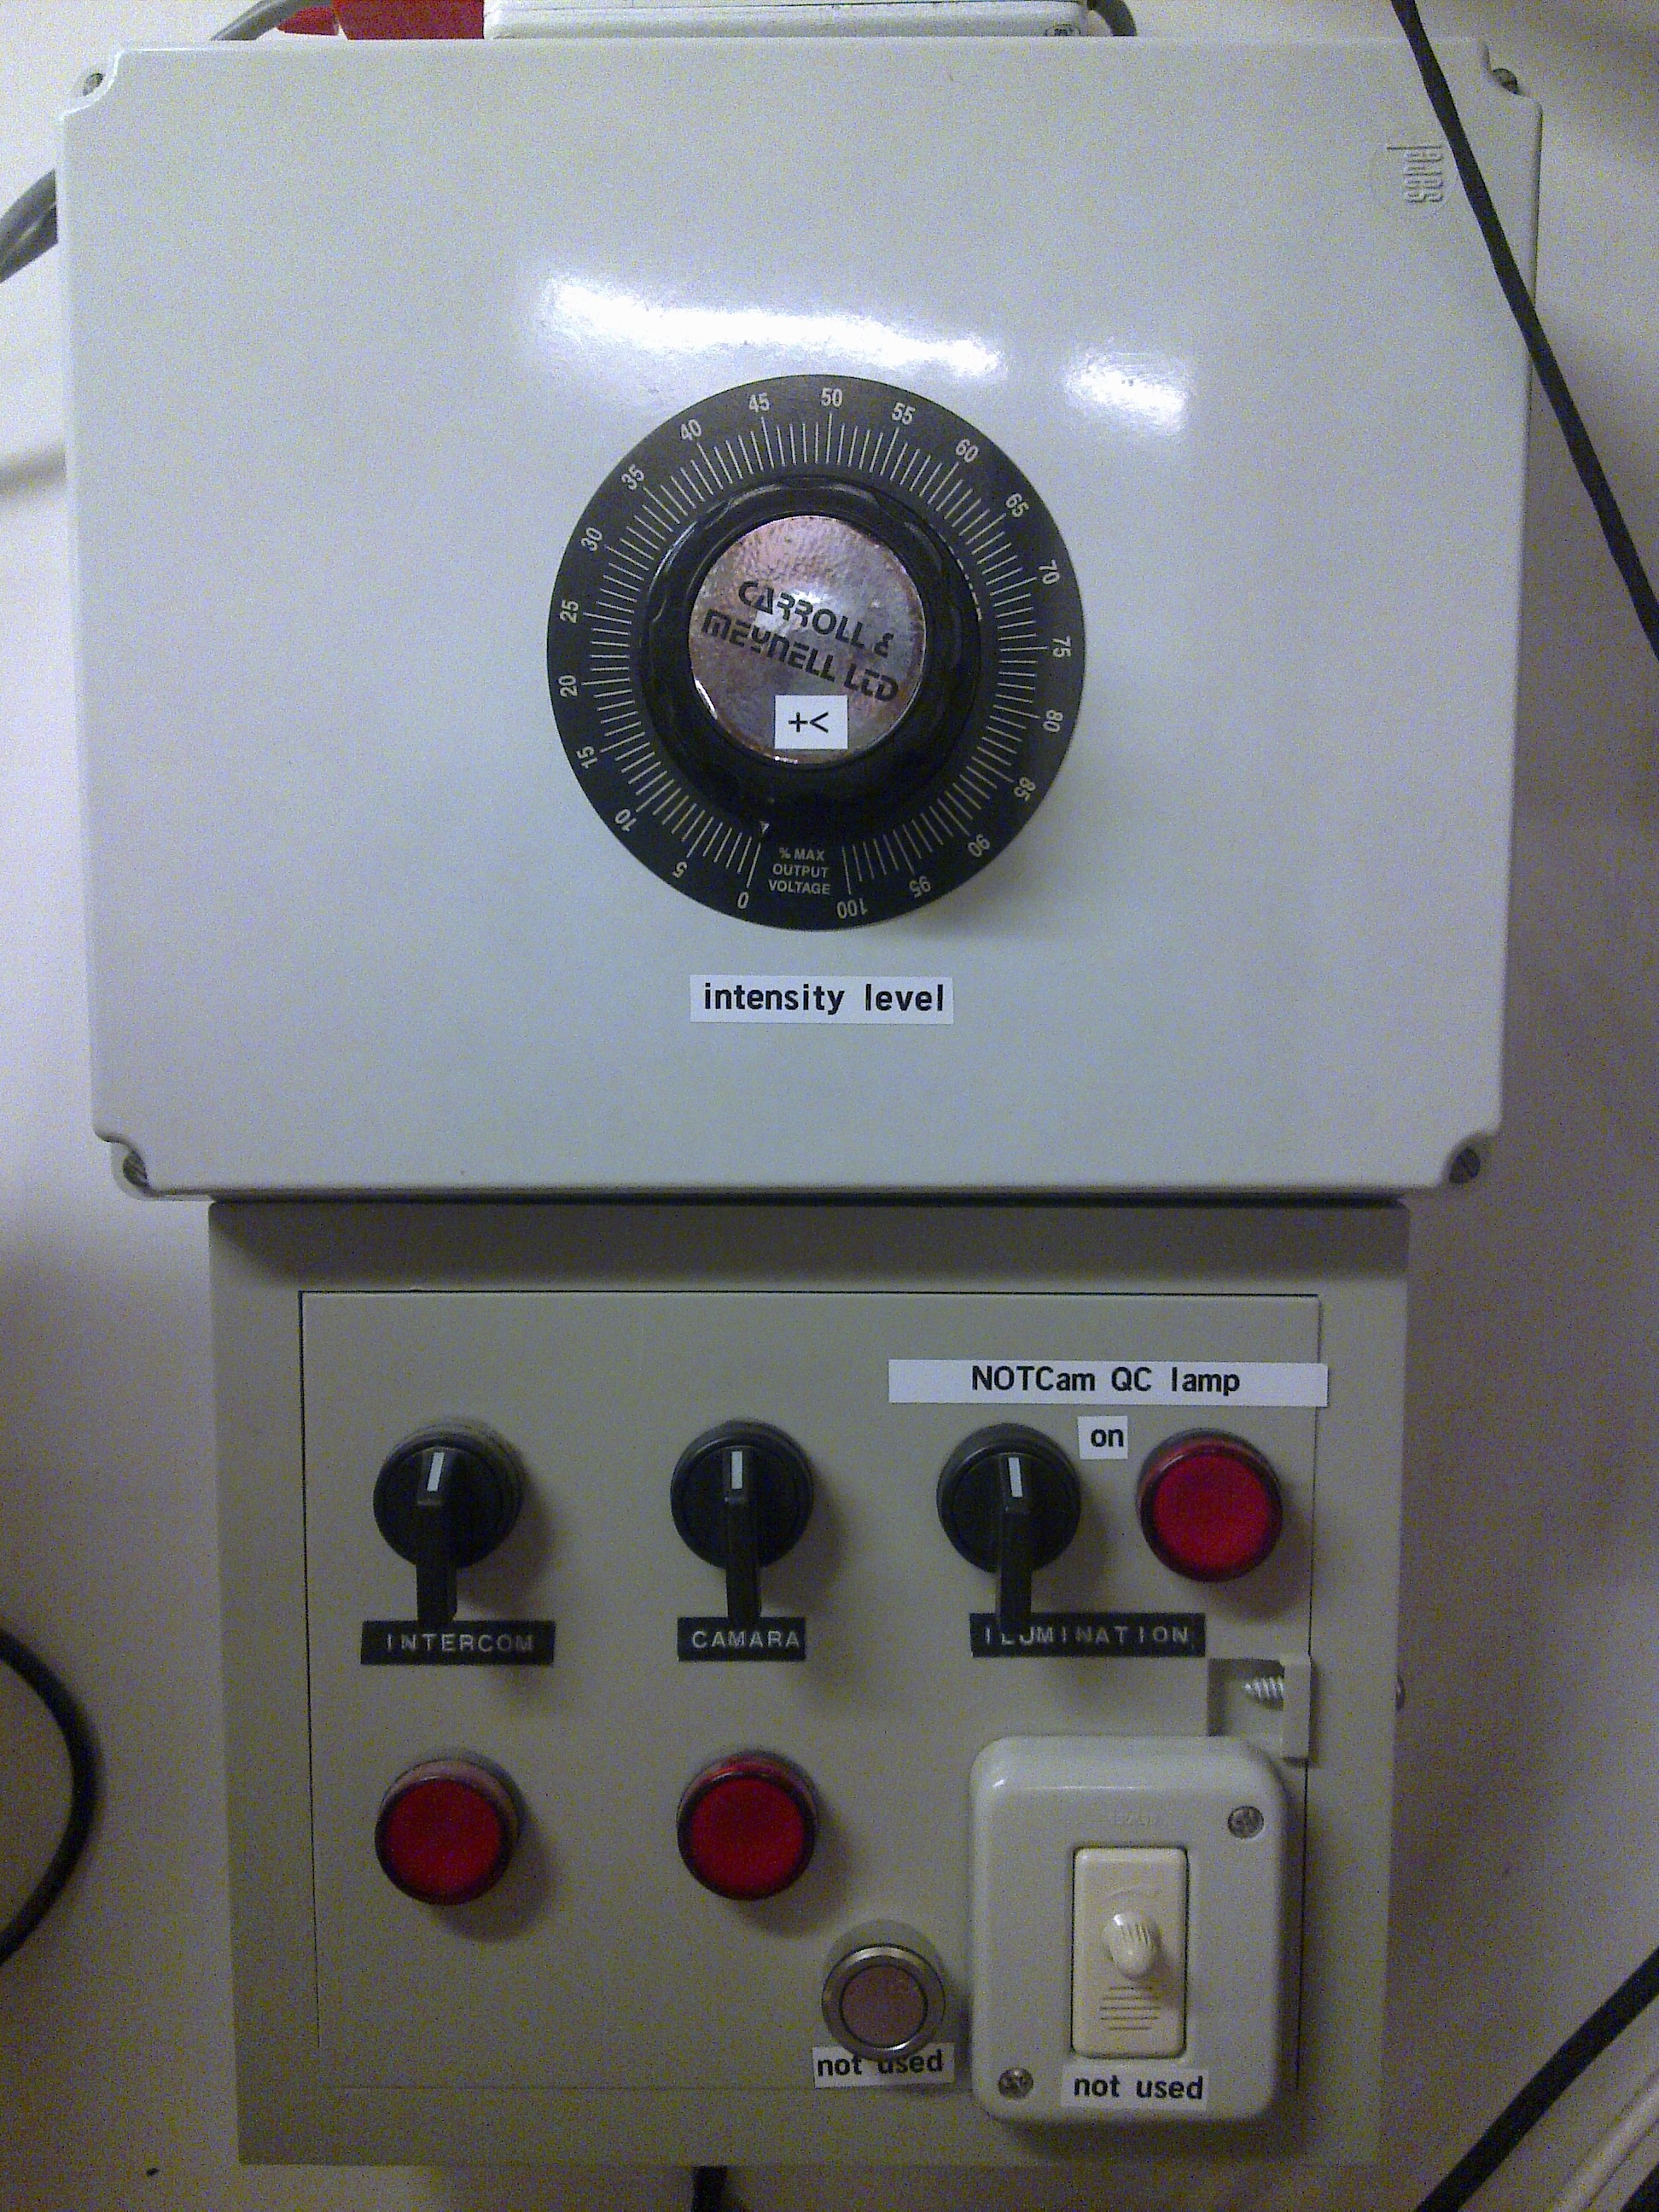
[obs@selena][NOTCAM]$ notcam.dark t [obs@selena][NOTCAM]$ notcam.mdark t N [obs@selena][NOTCAM]$ notcam.dframe t N NB! Since the array needs time to stabilize on the low count levels, it is recommended to take N > 3 subsequent darks of the same integration time, and preferrably disregard the first one(s). DomeflatsIt is recommended to use skyflats rather than domeflats, but if all skyflats could not be taken within the available twilight slots, then domeflats are an alternative. Like skyflats, domeflats should be done differentially, i.e. with the lamp ON and OFF using the same exptime. Because of structure on the inside of the dome, as well as daylight leakage through hatches, it is recommended to move the telescope to an altitude of 45 degrees. In order to do this, telescope power must be ON. The NOTCam-QC-lamp is located above the entrance door, i.e. light comes from behind the telescope giving a diffuse distribution, and it is operated from the control room on the panel on the wall in front of you. Turn switch rightwards to the "on" marker. The intensity can be adjusted on the upper panel from 0 to 100 (default = 56). Thus the procedure to take a set of differential domeflats is as follows:
switch NOTCam-QC-lamp ON reset the safety system TCS: power-on TCS: alt 45 TCS: open-mirror-covers [obs@selena][NOTCAM]$ notcam.setup-ima cam filter-ID [obs@selena][NOTCAM]$ notcam.mexp t N switch NOTCam-QC-lamp OFF [obs@selena][NOTCAM]$ notcam.mexp t N The exposure time t is typically 5-7 for K bands, 10-15 for J and H used with the WF camera. For all narrowband filters used with the WF camera, the lamp intensity should be set to max (100), and the exptimes should be around 10 for #223 and #224 and around 40 or more for the rest. When finished, remember to:
switch NOTCam-QC-lamp OFF TCS: zenith TCS: close-mirror-covers You do not have to power off the telescope if you start observing within an hour. SpectroscopyFor spectroscopy you must determine two good X positions on the array where you would want to put your targets for the ABBA mode. The dispersion is vertical, blue-to-red from upper-to-lower on the stored images. Thus, you need two clean vertical regions for your spectra. Take your own domeflat to check for hot and cold bad pixels. For instance exp 10 in the K-band gives enough counts from thermal emission without having to switch on a lamp. Define your position A to be a good x < 512 region and find your position B at some good x > 512 region. The separation (B-A)*pix_size, where the pix_size is 0.234'' for the WF camera and 0.078'' for the HR camera, is the step size in arc seconds you need for your ABBA script (typically it should be 20-60''). Position A is the X value you need as input in the slit-acquisition script notcam.slitoff X Y. Note down these values. The Y value must be determined on every new pointing due to instrument flexure. For spectroscopy you can switch between the different wavelength regions (Y,J,H, and K) using the script notcam.setup-spec which sets the internal focus according to the camera/slit/wavelength combination. Note that it does not move slit and grism wheels! Note also that K (208) rather than Ks (207) is used in order to cover 0.08 microns further towards the red, i.e. until about 2.36 microns. For spectroscopy you may wish to take some halogen flats and some arcs in the afternoon. Below are the steps to use the calibration unit mounted on the inside of the baffle lid. It consists of a halogen lamp for flats and two arc lamps (argon and xenon) for wavelength calibration. Useful exposure times are found in the table Typical NOTCam calibration lamp exposure times. In the example below we use the WF camera, the K-band (208), the 128 micron slit (0.6" width) and Grism #1, and we want to take 5 halogen flats of 7 seconds each, 3 argon arcs of 10 seconds, and one xenon arc of 20 seconds.
[obs@selena][NOTCAM]$ notcam.setup-spec
cam filter-ID slit-ID grism-ID
[obs@selena][NOTCAM]$ notcam.setup-spec WF 208 128 1 Manually put in the slit and the grism! [obs@selena][NOTCAM]$ notcam.calibexp [-n Nexp] [-o Object] [-LeaveMirrorClosed] [-lmc] lamp t [obs@selena][NOTCAM]$ notcam.calibexp -n 5 -lmc halogen 7 [obs@selena][NOTCAM]$ notcam.calibexp -n 3 -lmc argon 10 [obs@selena][NOTCAM]$ notcam.calibexp -lmc xenon 20 Note that the argon lamp may take some time to come on (up to 1 minute). For reference, the commands used to switch on and off the calibration lamps are: tcs.baffle-lamp-2-on and tcs.baffle-lamp-2-off, where the number refers to the lamp (1 = halogen, 2 = argon, 3 = xenon). You can check the status of the baffle lamps (whether they have been command to ON or OFF) on the TCS status page 30, as well as in a small window in the NOTCam obssystem. You may also use the wrapper script notcam.easy-calib that is meant for in-situ calibrations at night, and described under Quick instructions for Spectroscopy in this document. In this case, since the mirror cover is probably already closed, you should manually switch on the argon lamp one minute before starting the script. Telescope Startup ProcedureReturn to the dome at least 30 minutes before sunset and follow the instructions below. NB! If you want NIR skyflats, it is important to start early enough in order not to miss the useful twilight window. This depends on how many and which filter/camera combinations you need.
Weather precautions
Telescope settings and powerTelescope Control System (TCS)
Telescope power-on
Select your instrument
If you are going to use FIES, in one of the FIES sequencer windows on the left monitor type: [obs@selena][FIES]$ tcs.setup-tel-fies
to setup the telescope for observing with FIES. For more details, see the FIES Cookbook. Dome Opening before SunsetWith NOTCam the procedure to take skyflats may need to be started before sunset. Therefore, it is vital to point to a blank field in the East before opening the dome! Do as follows:
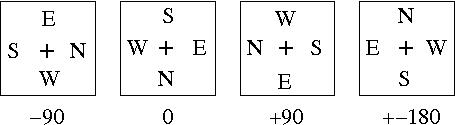
Field RotatorIn an alt-az telescope the field rotator is used to keep the orientation on the sky fixed while tracking. When the field rotator is in automatic mode, which is the default, the TCS command field-rotation value sets the rotator such that value is the angle between the sky and the instrument. The default value of the Field Rotator is different for each instrument and can be found in Table 1. The field-rotation value will be set to the default angle when executing the script setup-tel-notcam
The rotator-position is the physical position of the rotator with respect to the telescope fork, and it has a limit at +- 200 degrees. Its current value is shown on the TCS status display together with the time-to-reach-limit in minutes. Before reaching the limit, the TCS will send a warning and suggest you to turn the rotator 360 degrees at any convenient moment. This can be done manually with the TCS command ro-tu-360 after switching off autoguiding with ag-off. Note that this is possible only in the overlapping ranges [-200,-160] and [160,200]. If the limit is reached, the TCS will eventually, after repeated warnings, perform the full rotation automatically (whether or not an observation is ongoing). The exposure commands for ALFOSC, FIES, MOSCA and StanCam check whether the rotator limit is reached within the exposure time, if this is larger than 300 seconds. For NOTCam, where typically multiple short exposures are made, this is not the case. If you want to follow the same target continuously for many hours, and you wish to avoid having to turn the rotator, for instance because you want your target on exactly the same pixels all the time (transit light curves), you might consider using a different field-rotation value, based on the time-to-reach-limit value displayed on the TCS UIF. For the case that right after the telescope pointing the rotator will start off in the overlapping rotator range, the telescope can be told to automatically point using the rotator position that allows for maximum tracking time, with tcs.set-rotator-standard, which is the default behaviour. For details see the TCS documentation. If you have many pointings with relatively short exposures or you keep pointing towards the same region of the sky, you may save some pointing overheads by making the TCS choose the fastest rotator slew to reach either of the overlapping rotator ranges: set the rotator to fast mode using tcs.set-rotator-fast, which is a sticky command. To go back to the default mode, use the command tcs.set-rotator-standard . Camera ProbeThe Camera Probe is used for the standby Camera (StanCam) and for FIES and should be put in park position for all other instruments. Put the Camera Probe in the correct position by typing the TCS command as indicated in Table 1. The correct Camera-Probe position will be set when executing the script setup-tel-notcam Sky flatsThe exact timing of the useful window for near-IR twilight skyflats depends on the sky quality (dust, temperature) and the altitude of your blank field. Only a few minutes too late, and you may get too low S/N or a useless flat-field sequence. We recommend doing all NOTCam imaging skyflats in differential mode, i.e. taking bright and faint flats. This removes thermal emission as well as the dark. If you are using all broad band filters (ZYJHKs) with the WF camera we recommend the following order of the double (bright and faint) cycle: KsHJZY - KsHJZY. If you want JHKs with both cameras, then make sure you start early and follow the order in the table below. NB! It is vital that the exposure time is the same in the bright and faint pairs, otherwise the differential approach breaks down. It is important to have a relatively high count level in the bright images (but < 25000 adu to stay within the linear range) and a relatively low level in the faint ones (for broad-band JHK filters this is anything between a few hundred adu for the J band to a few thousand for the K). For practical reasons we recommend exposure times in the range 3-20 seconds. The longer the exposure times, the longer it takes to do the sequence, and the fewer filter/camera combinations can be done in the available twilight window. Below are the most useful commands for changing camera/filter, to take test exposures (repeatedly, until the levels are OK), and to run the skyflat script with telescope dithering.
[obs@selena][NOTCAM]$ notcam.setup-ima
cam filter-ID
[obs@selena][NOTCAM]$ notcam.setup-ima hr 207 [obs@selena][NOTCAM]$ exp 1 [obs@selena][NOTCAM]$ notcam.skyflat exptime The notcam.skyflat script takes 8 flats with the given exposure time, dithering the telescope in 10'' steps, and takes about 3-4 minutes. Change filter and restart the script. By using the notcam.setup-ima script to change filter/camera, the telescope focus is adjusted automatically. If you happen to saturate on the test exposures, run clean3.
The typical exptimes given in the table above is an example where the observing sequence started 11 minutes before sunset, the pointing was ESE and the zenith distance 48 degrees. The sky intensity varies with pointing, sky quality and time of year. It is possible to take both cameras (HR and WF) in JHKs and that takes about 50 minutes in total. NB! Repeat exactly the same sequence in order to get the faint images. Examples of how raw skyflat images should look like can be found in NOTCam calibration images. The structure is similar for all filters. AutoGuiding - general instructionsAutoGuidingIt is recommended to have the telescope autoguide on an optical source close to your target object. The TCS is automatically selecting a star from the HST guide star catalogue. The guide probe is then automatically placed at the correct position to auto-guide on this star.
Hints for manual guiding and tweaking of telescope pointingIf guiding mode is set to auto-pos-off, the guiding has to be activated manually. Furthermore, in case that the pointing is not optimal, some manual tweaking may be required. For manual choosing of a guide star, start with preseting to target. Find a guide star on the screen and move the star box to the star by pressing the key change move mode (5) on the TCS several times until the option Star Box is shown. Move the box by using the keystroke combination Alt Funtion + arrow keys. Alternatively, choose the move mode Guide Probe to move the star into the box, or use the command move-g. To set the step size of the Guide Probe, type probe-step-size x y on the TCS, where x and y are in arcseconds. In case the telescope pointing is not optimal, in particular if the guide star ends up outside the screen, a pointing correction can be made with the move mode called Telescope: press the key change move mode (5) on the TCS several times until the option Telescope is shown, and move the star by using the keystroke combination Alt Funtion + arrow keys. The step size of the Telescope is set with the command offset-size on the TCS UIF. Alternatively, if no guide star can be found on the screen, use get-guide-star 2 (or 3,4,5, etc.) to get a new guide star from the guide server at the current pointing.
If still no guide-star is seen on the guide TV,
the Aladin@NOT
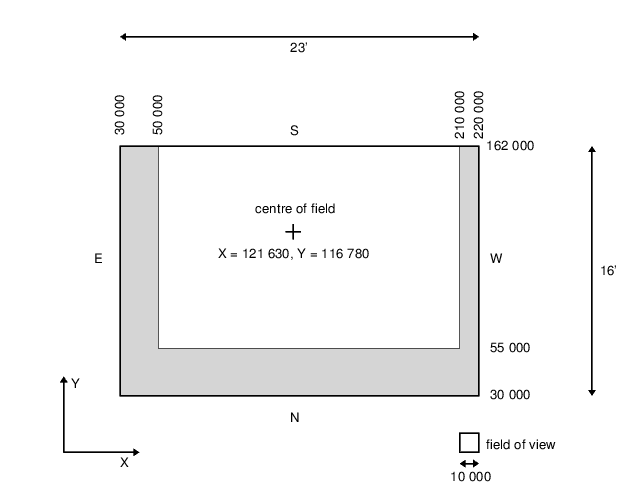
tool allows to identify suitable guide stars: When the star is placed in the starbox, type ag-on on the TCS to switch on autoguiding. To switch off the autoguiding, type ag-off. Guiding on moving targetsIf you are observing moving targets, view the page Tracking of Moving Targets, in the Appendix. AutoGuiding with NOTCamNB! Autoguiding is recommended ALWAYS for optimal image quality, even with the short exposure times used in the infrared. It is also recommended during focusing. Note that because of the dithering strategy used in the infrared, autoguiding should be done using the proper NOTCam guide area. The guide camera has to compensate for the movement of the telescope, but it has a limited area to move across due to the shape of the field used for the guider, as depicted by the grey area in the simplified sketch below (from original TCS manual). The small square at the lower right shows the FOV of the guide camera. Thus, depending on the dithering or beamswitch strategy of the observation, the original guide area must be reduced to smaller and even placed in specific areas to allow the requested movements.
 OB scriptsIf you have prepared your observations with the OB Generator, you will save time at the telescope, since you have already entered the proper NOTCam guide area, which means you have probably read this section before, and you can skip it now. The only thing you would wish to make sure is that the tv-filter and tv-focus is set to optimal values, for example:
[TCS] tv-fil r
[TCS] tv-foc 490 If the correct guide-areas are set in the OB, the autoguiding is automatic and usually works well. If you have problems, the following paragraphs may be useful. NOT AladinIn order to visualize how the guide area looks like at the current pointing, you can use the web tool NOT Aladin where you can select to view the Aladin Sky Atlas 2MASS or DSS2 image with the whole Guide probe area or any specific instrument field or even the Guide TV field shown. The Default guide area is shown as a full red line, while the dotted line shows the permitted area in which the guide probe can move. The guide stars selected by the Guide Star Server (GSS) are marked in green. The current location of the Guide TV is also shown.
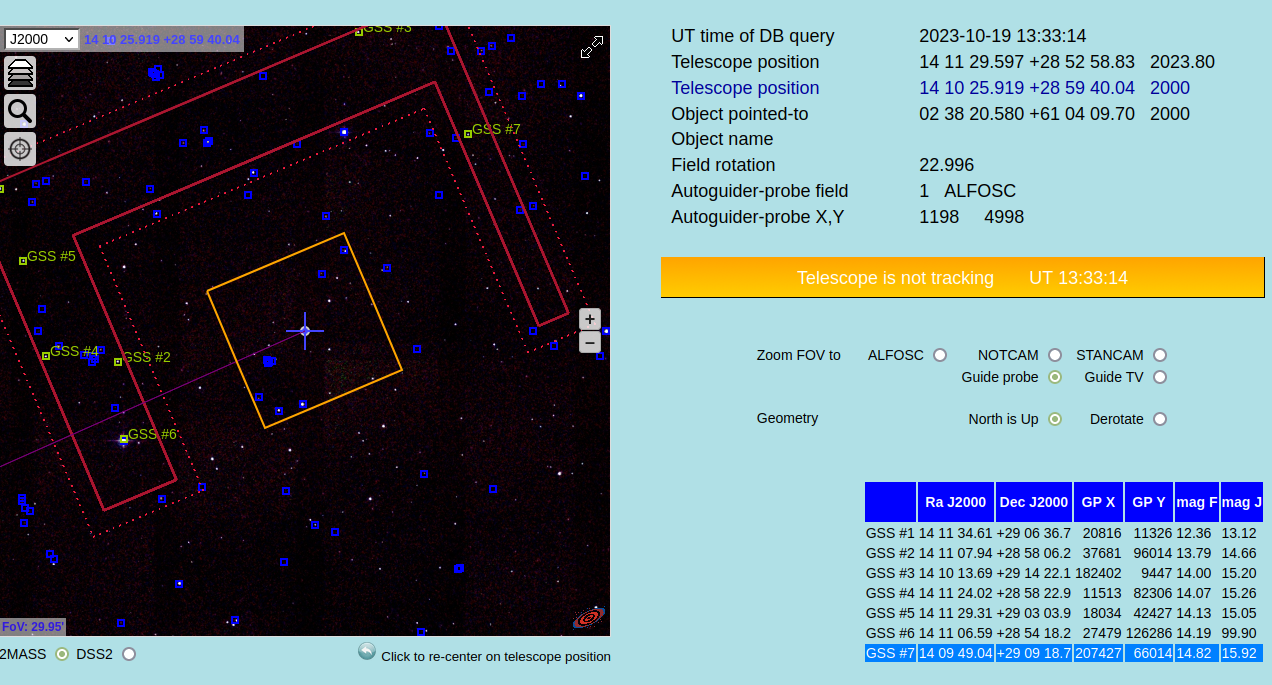 Note that if you have clouded weather or bad seeing, perhaps you can find a bright star (that was filtered out by the GSS), and you can move the cursor over it to get the GP X,Y numbers displayed, which you then can enter on the TCS UIF these values simply as X **** and Y ****, followed by auto-pos-retry. Auto-guiding advices
If the instrument name on the TCS is NOTCAM and by default the default
NOTCam guide area will be used (red continuous line on NOT Aladin). This is good enough for
normal small step dithering (e.g. 3x3 dithers with 10-20" step size) as it allows a guaranteed 60''
step of the guide probe in any direction from the initial pointing.
If this is not sufficient, because you require larger offsets, you must specify your guide area,
according to your dithering mode, manually as follows, either on the TCS command line
(example given in green for the reduced area, allowing a guaranteed 100'' step in any direction):
[TCS] ag-off
[TCS] get-guide-star N area [TCS] g-g-s 1 NOTCAM-Re [TCS] auto-pos-retry wait until guiding
or, in the Sequencer terminal (example in green for beamswitch):
[obs@selena~][NOTCAM]$ tcs.ag-off
[obs@selena~][NOTCAM]$ tcs.get-guide-star N area [obs@selena~][NOTCAM]$ tcs.get-guide-star 1 NOTCAM-N-negX [obs@selena~][NOTCAM]$ tcs.auto-positioning-retry wait until guiding where the first input parameter, N, refers to the star number in the list of available guide stars found by the Guide Star Server, filtered and sorted according to brightness, while the second parameter area is the specified NOTCam guide area, i.e. either one of the fields listed below (e.g., NOTCAM-Re, NOTCAM-N-negX, NOTCAM-W-posY, ... etc. ). If N = 1 the guide probe will move to the best guide star available for the selected area, and if you don't like this one (e.g. it appears double) or it is not there (e.g. an error in the catalogue), you can try N = 2. NB! Note that the guide area you specified might accept the current guide star, in which case no movement occurs upon the command get-guide-star. Make sure the TCS status field says "guiding" before you continue. Description of available guide areasThe default NOTCam guide area (NOTCam-De) guarantees that autoguiding can proceed with the same guide star during dithering for the typical small teloffsets. For any guide star an offset of 60'' from the initial pointing is guaranteed. This is valid for instance for the frequently used 9point (3x3 grid) dither with 10-20'' step size and for typicaly point source spectroscopy with an AB offset up to 60''. If you are doing larger dithers or offsets, you want to use the reduced NOTCam guide area (NOTCam-Re) which guarantees an offset of up to 100'' in any direction away from the initial pointing. If you do beam-switching or you step > 100'' away from the initial pointing (for instance using an ABBA dither with step size > 70"), you must select among the Beamswitch guide areas below - according to your beamswitch off-target direction. NB! The sky directions N,S,E,W are valid only for the default NOTCam field field-r -90 and refer to the direction in which you move the telescope. The positive/negative XY directions, however, refer to the movement of the target(!) on the array, and these are always valid, irrespectively of the field rotation. (Note that you may change the field-rotation to adjust the off-target direction on the sky.) Below is a listing of all available NOTCam guide areas:
The above beamswitch guide areas are to be used with the observing script notcam.beamswitch where the beamswitch directions are given as S-posX, N-negX, E-negY, W-posY, as well as for any self-made beamswitch observing script. The maximum offset (away from pointing) allowed for these areas is 10' (EW) and 13' (NS). In all cases small step dithering of the order of 15'' is allowed in any directions. Note that the guide system does not allow for large steps in all directions within one observation. No guide star found?Note that if there are very few guide stars at your target position (high galactic latitude, or a dark cloud), check out the NOT Aladin tool. If you do not find a suitable guide star at the offset direction you had planned, you may choose another, or potentially change the field rotation to another than the default field-r -90. Focusing the TelescopeFocusing the Telescope with NOTCAM The telescope focus depends on temperature and zenith distance. These relations have been measured to a high accuracy and the corresponding corrections are applied in real time by the TCS (note that you will not see these corrections in the focus value displayed on the TCS since this value is kept constant to avoid confusing the observer). The reference telescope focus for NOTCam is determined each night using the Focus Pyramid with the WF camera and the Ks filter, and the focus value is entered in either of the two ways:
[TCS] foc-pos 26750
[obs@marissa][NOTCAM]$ tcs.focus-position 26750 where the value in the above example is the default NOTCam focus, which is also set when running the telescope setup script for NOTCam:
[obs@selena][NOTCAM]$ tcs.setup-tel-notcam
The focus pyramid is calibrated with the internal camera focus set to 5650 and 20, respectively, for the WF and HR camera. Because it is calibrated for the Ks filter, we recommend finding the reference focus for the WF-camera and the Ks filter and use the measured focus-offsets for other filters/camera combinations (see table below).
Note that the following instrument setup scripts automatically apply the focus offsets required for filter/camera/obsmode by modifying the tcs.focus-delta. It is assumed the foc-pos value currently set is the one for WF-camera imaging in the Ks filter (either the default value or the nightly determined value) and the setup scripts do not change this value!
[obs@selena][NOTCAM]$ setup-ima cam filter-ID
[obs@selena][NOTCAM]$ setup-spec cam filter-ID slit-ID grism-ID
The focus offset is wavelength dependent, so for the narrow-band
filters the focus offset for the closest broad band filter is used. How to: step by stepIn order to focus the telescope for NOTCam you should use auto-guiding and sky-subtraction. You can use the NOTCam standard star fields for focusing (notcamstd.cat) or you can use the NOT focus catalogue (focus.cat). Load the desired catalogue on the TCS:
[TCS] tv-on
[TCS] read focus.cat [TCS] read notcamdstd.cat In the TCS catalogue select a focus field and press numerical key [4] to go there. Make sure you are guiding! In the following recipe the first image is subtracted from the subsequent images by giving its full file name (NCxxxxxxxx.fits). The parameters given in green are example or suggested values/names.
[obs@selena][NOTCAM]$ setup-focpyr WF
[obs@selena][NOTCAM]$ exp 15 [obs@selena][NOTCAM]$ setskysub imagename.fits [obs@selena][NOTCAM]$ teloffset -15 0 [obs@selena][NOTCAM]$ exp 15 [obs@selena][NOTCAM]$ focuspyr-auto The output from focuspyr-auto gives you the offset to be applied to the current telescope foc-pos value. Set the new focus value on the TCS with the command:
[TCS] foc-pos XXXXX
where XXXXX is the 5-digit new focus value. Iterate the last two steps until you converge. When finished, remember to take out the pyramid, or simply run the setup script:
[obs@selena][NOTCAM]$ setup-ima cam filter-ID
Rather than using the fully automatic focuspyr-auto you may also use a manual command focuspyr. On the DS9 you put the cursor on the upper one of the 4 images of the star you wish to measure, then press 'a', and then press 'q', and the offset to be applied is output. Quick observing instructions NOTCamField RotatorFor general information about the field rotator see an earlier section in this cookbook called Field Rotator and Camera probe. Every instrument has its default field rotation angle, for NOTCam it is -90, selected as such to cause minimal spilling of LN2. The script tcs.setup-tel-notcam sets the field rotation to default, but you can use any orientation, for instance if you want to do spectroscopy on the parallactic angle (see NOTCam Spectroscopy ). For most imaging applications the default value is fine. The figure below shows the sky orientation on the NOTCam array with different values of the field rotation. If you want a given sky position angle (PA), you have to calculate a new field rotation: new_field = -180 + PA, where PA is measured from North and eastwards. If you wish to modify your current field rotation, then calculate new_field = current_field + d_angle, where d_angle (in degrees) is positive for clockwise rotation and negative for counter-clockwise rotation, referring here to the direction you rotate your stars on the array. You can also use the Pointing Script Generator, where you enter a sky PA and the script calculates the correct field rotation angle. Note that for spectroscopy it is the slit position angle on the sky that counts, but this is taken care of in the Pointing Script Generator for spectroscopy. Your current field rotation is always given on the TCS status display.
 NOTCam Imaging using OB generated scriptsMake sure you are in your home directory in the Sequencer Terminal, i.e. in ~obs/scripts/proposal-ID, where proposal-ID refers to your proposal ID number. This is where your OB-generated scripts are located once you have compiled them inside the OB generator, which you can only do when in the local NOT environment, for instance in the control room.
To run an OB script, locate it in your folder, copy and paste the "scriptname" on the command line: [obs@selena][NOTCAM]$ cd ~obs/scripts/proposal-ID
[obs@selena][NOTCAM]$ ls -lrt [obs@selena][NOTCAM]$ "scriptname" The script is interactive and will ask you to verify that auto-guiding is ok before executing the observation. Be attentive to instructions in the sequencer window. Note that it is recommended to set skysubtraction on in a way corresponding to your observing mode, typically subtraction the previous image, but if you use mexp t N you will want setskysub N+1. In another sequencer window type for instance: [obs@selena][NOTCAM]$ setskysub 1
[obs@selena][NOTCAM]$ setskysub no The command is sticky and every new image will be displayed accordingly. You can manually re-display the last image with the command display, or any image with the command display imagename .
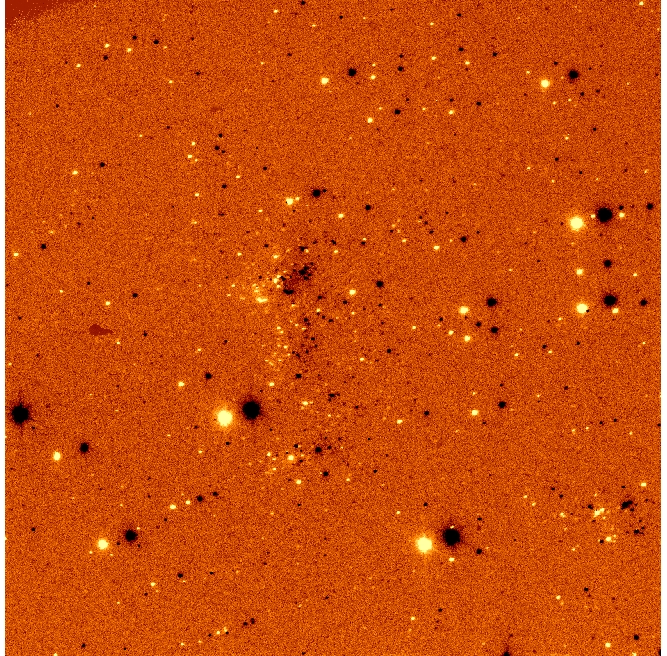
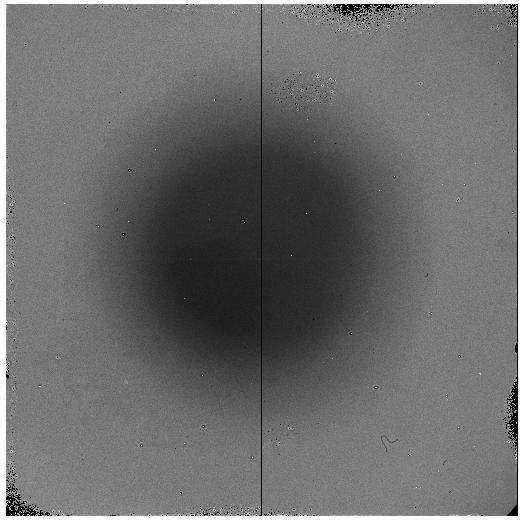
Left: Raw WFC Ks-band image. Right: Sky-subtracted Ks-band image using previous image in a dither. Manual observing with template scriptsMake sure you are in your home directory in the Sequencer Terminal, i.e. in ~obs/scripts/proposal-ID, where proposal-ID refers to your proposal ID number. This is where your submitted scripts have been uploaded, OB generated scripts, as well as alternative pointing scripts, and finding charts. New! If you have used the OB generator to make scripts, the compiled OB scripts with finding charts will be uploaded to your script directory on the instrument computer. To run the script, type the script name in the sequencer window. This replaces the following steps (1 - 4) of (semi-)manual observing. Note that point 3 also describes how to set the on-line sky-subtraction manually.
If you want to modify an existing NOTCam script, you can copy the original to your own directory and edit it (NB! it is vital that you call it something different!) [obs@selena~][NOTCAM]$ cp ~staff/notcam.as05-jhk my.as05-jhk
You can load a NIR standard star catalogue on the TCS by typing read JHKstd_leggett.cat or read JHKstd_hunt.cat. Reference papers: Leggett et al. 2006, MNRAS 373, 781-792 and Hunt et al. 1998, AJ 115, 2594. Or you may use our Selected JHKs standard fields for NOTCam and load them on the TCS by typing read notcamstd.cat. For these last sources there are sequencer scripts that make telescope pointing as well as the full JHKs cycle (see NOTCam Sequencer Scripts).
An IRAF package called notcam.cl is available for Quick Look reductions while observing. It is run off-line on the "Florence" computer where the data disk is cross-mounted (thus no need to copy raw data!). Check the Data reduction section in the NOTCam User's Guide for instructions. If the seeing improves, it is recommended to redo the focusing on a focus field at high altitude. The telescope focus position foc-pos should always be set to the focus value for the WF-camera K-band. If you wish to rotate the image on the DS9 display to have North Up and East Left, you can click on Zoom and then tick the Align button, or alternatively using the command line you can toggle alignment on/off with the sticky command: [obs@selena~][NOTCAM]$ notcam.wsc-align yes/no
Be aware that working at zenith distances larger than 60 degrees may cause some spilling of LN2, and subsequently cause a slight temperature increase of the detector. For a typical night the detector temperature has been found to change by +-0.1 degrees only. NB! In order to have a stabilized detector where all effects subtract out well, it is recommended to take an exposure equal in time and readout mode to the one you use in your scripts before starting the script, i.e. take the target acquisition image the same way you would observe. At every change of integration time and/or filter the background level changes and the array needs to stabilize again. Alternatively, you can just skip the first image during data reductions. For this same reason, it is not recommended to use the clear command in the beginning of each script if you plan to repeat the same script in order to get deep images. The clear command is useful if you have saturated, however, and want to get rid of memory effects. NOTCam Spectroscopy with OB generated scriptsPIs can prepare their observations using the OB generator, but note that the OB compiler for NOTCam spectroscopy makes semi-automatic scripts, not full scripts as for ALFOSC. You can compile OB scripts from the OB generator or from the OB queue once you are inside the NOT environment, e.g. when you are in the control room. Run your script by locating it and pasting its name on the command line, as follows: [obs@selena~][NOTCAM]$ cd ~obs/scripts/proposal-ID
[obs@selena~][NOTCAM]$ ls -lrt [obs@selena~][NOTCAM]$ "scriptname" The script sets correctly all the FITS header keywords and does the pointing and shows the finding chart. When the telescope is guiding, the message to the observer is to go to another sequencer terminal window and run the observations.
Here follows the 4 main steps to take (1. slit acquisition, 2. taking exposures, 3. change of wavelength region, 4. lamp calibrations):
Important! When finished with the OB, go back to the OB script window and press return. This will stop the OB tracking log, and the execution time will be set correctly. Now do the telluric standard star OB in the same way. The lamps you took for the target will suffice for the standard if it is taken right after the target.
Comments:
NOTCam Spectroscopy in the manual wayMake sure you are in your home directory in the Sequencer Terminal, i.e. in ~obs/scripts/proposal-ID, where proposal-ID refers to your proposal ID number. This is where your submitted OB scripts have been uploaded. Note on focusThe default NOTCam telescope focus is defined as the best focus for WF-camera imaging in the Ks band (internal focus set at 5650). This value is determined using the Focus Pyramid in the beginning of each night (see above section on Focusing) and its value is typically close to the default value: 26750 The default telescope focus for spectroscopic mode is about 200 units lower for WF-cam spectroscopy and about 150 units higher for HR-cam spectroscopy. This is due to the different internal focus values needed for each camera/filter/slit combination in order to have the slits in focus. Both the telescope offsets mentioned above as well as the internal camera focus values for each setting are accounted for automatically when using the setup script: [obs@selena][NOTCAM]$ notcam.setup-spec cam filter-ID slit-ID grism-ID
[obs@selena][NOTCAM]$ notcam.setup-spec WF 208 128 1 where the example is given for K-band WF-camera spectroscopy using the default 0.6" (128 micron) wide slit and grism #1. Target acquisitionIt is recommended to always use autoguiding. Automatic acquisition of guide star and starting of autoguiding is done if you have set the command tcs.auto-positioning-full. Note that for most spectroscopic observations with NOTCam, the dither along the slit is typically smaller than 60'' and you may therefore use the default guide area. This may not always apply:
The default field rotation for NOTCam is field-r -90, but for your spectroscopic observations you may want another field angle, either because you want two targets in the slit, or because you wish to observe your target on the parallactic angle. This is prepared in advance using the OB generator , or alternatively, the old Pointing Script Generator. If not, you have to do as follows:
Again, both the field-rotation as well as the guide-area setting can be well planned in advance and entered into the OB generator , alternatively, the old Pointing Script Generator. Also, note that on the DS9 display you can align the image to have North Up and East Left by clicking on Zoom and then the Align button, or alternatively on the command line you can toggle alignment on/off with the sticky command: [obs@selena~][NOTCAM]$ notcam.wsc-align yes/no
Slit acquisition
There is an interactive script for NOTCam slit acquisition called notcam.acquisition
that works similarly as alfosc.acquisition, but with a few important additions:
[obs@selena][NOTCAM]$ notcam.acquisition -c -q -noslitim cam slit filter-ID expotime
[obs@selena][NOTCAM]$ notcam.acquisition -c -q WF 128 208 0.5
The above example (in green) is for WF spectroscopy in the K-band.
The script is interactive and prompts you for actions. Follow the instructions given in the
sequencer window. The -c flag makes a slitview exposure of the target on slit, and the -q flag queries the user for possible iterations. The normal procedure is to take a slit image at every new pointing and measure the slit position, but if you know what you are doing, you can skip this with the -noslitim flag. The script needs to know which camera you use (HR or WF), which slit (128 or 44), and which broad-band filter to sort the orders (Z = 237, Y = 236, J = 201, H = 203, Ks = 207, or K = 208). Manual slit acquisition (old)Because of instrument flexure, the slit position may vary slightly with telescope pointing, thus for each new target it is recommended to take a short image (t = 2-5 sec) of the slit to measure its Y-value at the X-position you defined as a good in the afternoon. (Lately, defining position A at X=430 with an offset of 42.12" has been found to be a good location, but check the array for bad pixels.) Use imexam and measure on the DS9 the Y-position of the slit (at your desired X-value for position A) using the key 'k'. The step by step procedure for acquisition on the slit is therefore as follows:
[obs@selena][NOTCAM]$ setup-spec cam filter-ID slit-ID grism-ID
Put in the slit! No grism! [obs@selena][NOTCAM]$ exp t [obs@selena][NOTCAM]$ imexam Note down XY. Take out the slit! [obs@selena][NOTCAM]$ exp t [obs@selena~][NOTCAM]$ slitoff X Y [obs@selena][NOTCAM]$ exp t [obs@selena~][NOTCAM]$ slitoff X Y Where one iteration of the slitoff task usually is enough to have the star centered on the slit with high precision. Follow descriptions which typically ask you to locate your target with the cursor and then press
and then type 'q' to quit. Now the telescope moves and the guide probe follows. (The acquisition image should be taken with the broad-band filter you will use for spectroscopy.) Comment: If your target is brighter than the sky, then you may use the slit image as a "sky-subtraction" image
[obs@selena][NOTCAM]$ setskysub imagename
[obs@selena][NOTCAM]$ setskysub NCvj010015.fits and you will automatically see where your target lands on the negative slit image. If your target is fainter than the sky, you will have to take two aquisition images as a start, with a teloffset in between, such that you can use the first one as the sky-sbutraction image. Taking spectra and calibration lampsWhen you are satisfied with the slit acquisition, you can start the dither script. The ABBA dither is a frequently used mode, but an improved AB3 dither mode is also offered. (Be aware that the first exposure must be discarded in all cases.) The AB3 mode takes 6 spectra in an ABABAB pattern. The AB3-beamswitch mode allows you to do spectroscopy of extended targets. You may use and find more details about the available dither scripts. Examples of use:
[obs@selena][NOTCAM]$ abba t N object step-size
[obs@selena][NOTCAM]$ abba 10 10 HIP2435 42 [obs@selena][NOTCAM]$ ab3 t N object step-size [obs@selena][NOTCAM]$ ab3 30 10 mytarget 42 [obs@selena][NOTCAM]$ ab3-beamswitch t N object direction off-beam step-size [obs@selena][NOTCAM]$ ab3-beamswitch 30 10 mytarget W-posY 120 15 to give as input the parameters t and N in the notcam.frames t N command. In the above ABBA example the exptime per dither position is 100 seconds. The teloffset step-size (in arc seconds) is between position A and B for ABBA and AB3. For AB3-beamswitch the off-beam is the beamswitch step going in the direction direction, while the step-size is the small-step dithering along the slit for both ON and OFF target spectra (useful for removing bad pixels). Note that only the ramp-sampling readout mode is offered for spectroscopy, using the exposure command frame t N, and the minimum exposure time is 3.6 seconds with frame 3.6 1. The scripts put in the grism if it is not already in the path.
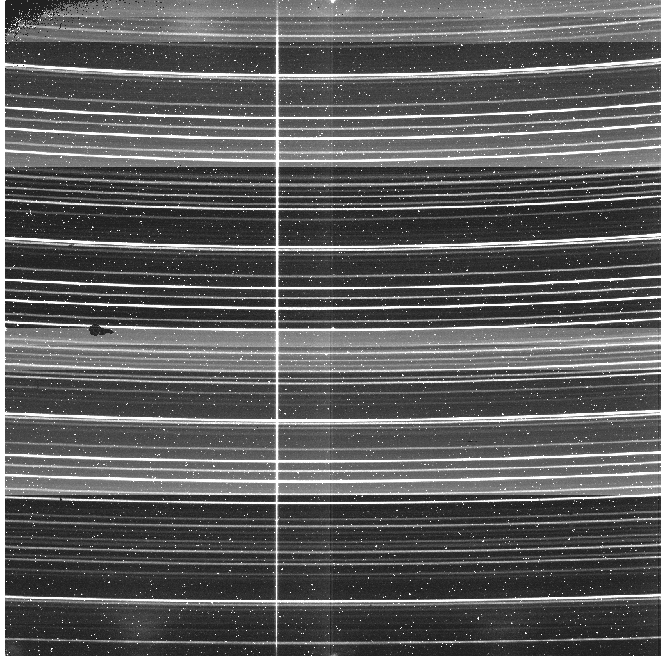
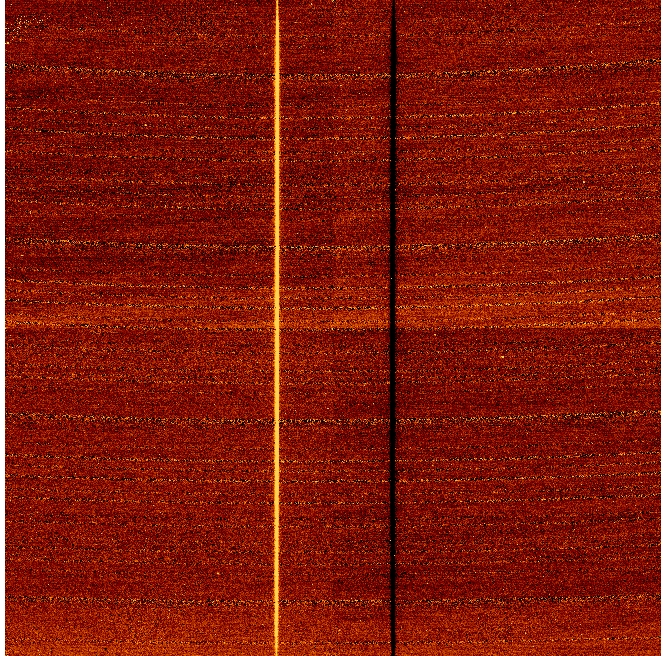
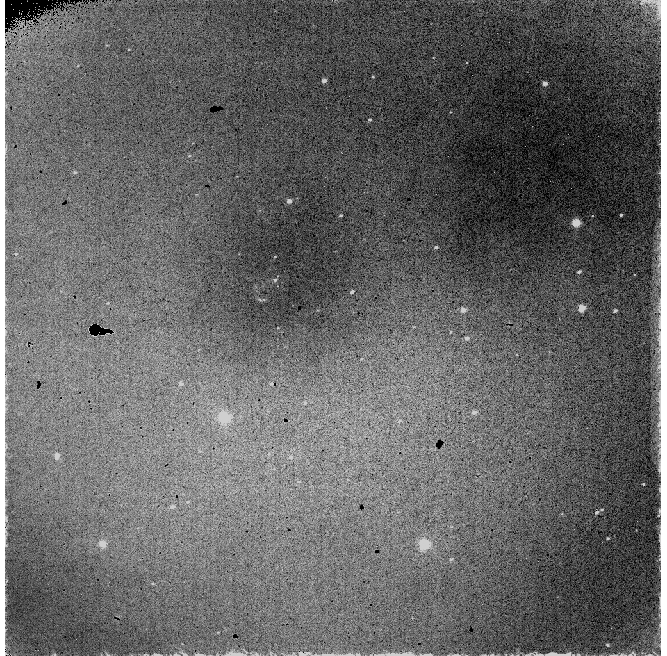
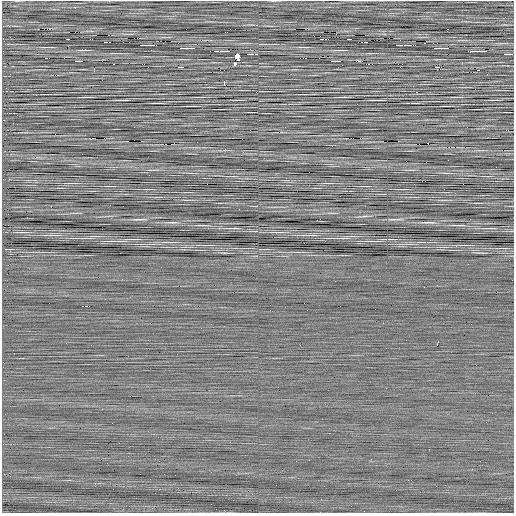
Left: Raw WFC H-band spectrum of a star at position A (x=425). Curved horizontal lines are sky lines (exptime = 130s). Right: Sky-subtracted A-B position H-band spectrum. The spectra are oriented vertically on the IR array with blue-to-red wavelengths going from the top to the bottom. The notcam.abba and the notcam.ab3 scripts use the automatic quickspec option on incoming images to extract the individual spectra with an optimal sky-subtraction setting. This sky-subtraction setting is also used for the DS9 display. The quickspec settings can be modified using quickspec-config and you can manually run it on any spectroscopy image with the command quickspec filename . It is highly recommended to take wavelength calibration lamps while pointing at your target due to flexure of the instrument. It is also easier to deal with fringing having spectral flats taken in-situ. The calibration unit for NOTCam is mounted on the inside of the baffle cover, and for this reason it is necessary to close mirror covers when using these lamps. Closing and opening the mirror-covers takes 1.5 minutes, and in order to minimize extra overheads, we recommend the use of the script notcam.easy-calib for in-situ calibrations at night after taking the target spectra. Neither the slit nor the grism is moved, notcam.setup-spec is used to change between wavelength regions, and notcam.calibexp to perform the calibrations. The script takes 1 argon, 1 xenon, and 3 halogen lamp images per wavelength region using the default calibration lamp exposure times, and you can take up to 5 wavelength regions at the time. The total time needed is about 2 minutes per wavelength region plus 1.5 minutes for the mirror cover movement. When finished, you should be back guiding on your guide-star, with the target aligned in the slit, ready to continue on this target, if neeeded.
[obs@selena][NOTCAM]$ easy-calib fid1 [fid2] [fid3] [fid4] [fid5]
[obs@selena][NOTCAM]$ easy-calib 208 [obs@selena][NOTCAM]$ easy-calib 208 203 201 [obs@selena][NOTCAM]$ easy-calib 208 203 201 236 237 Due to the slowness of the argon spectral lamp in switching on, the script switches on this lamp already while closing the mirror-covers. Then all the argon lamp images for all wavelength regions are taken first. After this, xenon and halogen lamps are taken per region. The wavelength regions are defined by the filter ID-number of the broad-band filters: 208 = K, 203 = H, 201 = J, 236 = Y, 237 = Z. If you want to obtain calibration images in a more manual fashion, use the notcam.calibexp script to take the number of lamps you wish. The script will stop auto-guiding, turn off TV, close mirror covers, switch lamp on, take exposure, switch lamp off, and, depending on your choice, either 1) leave mirror covers closed (if you set -lmc), or 2) re-open, switch on TV, set back the correct TV-filter, and re-acquire autoguiding. Here follows an example:
[obs@selena][NOTCAM]$ calibexp -lmc lamp exptime
[obs@selena][NOTCAM]$ calibexp -lmc halogen 7 [obs@selena][NOTCAM]$ calibexp -n 2 -lmc argon 10 [obs@selena][NOTCAM]$ setup-spec wf 203 128 1 [obs@selena][NOTCAM]$ calibexp -lmc halogen 7 [obs@selena][NOTCAM]$ calibexp -n 2 argon 2 Standard starsDon't forget to take telluric standard stars at each target pointing. See NIR telluric standard star search (Gemini page). At the end of the night
Closing Down ProcedureClosing the telescope
Data saving and retrievalInstructions on how to retrieve data from ALFOSC, NOTCam, StanCam, MOSCA and FIES are found in Data Download instructions. Only principal investigators have direct access to their data on the data server. The principal investigators can grant access to their data by generating and distributing a shared link. Details on how to do so can be found in the instructions.
Accessing raw and reduced data at nightThe computer called florence is setup for you to make a quicklook analysis of the incoming data, e.g. by starting up DS9 and IRAF:
   > cd newiraf
   > ds9
   > xgterm -sb -fn 9x15 -sl 400 -cr red -title IRAF -e ecl &
For the different instruments we have on-line reduction programs running, that deposit the reduced products on a disk accessible on florence.
The raw and reduced data files can be found on florence under directories Copying data products from florence over the wifi in the NOT control room to your own mobile computer is no longer feasible. Use the Data Download tool.
Archival requests
To obtain NOT data from our archive, first compile a list of file
names of the calibration and science data to be retrieved, using our FITS archive.
Note that this archive does not show the
data obtained in the latest twelve months, due to the propriatary
period. Compensation for override observationsIf your program was interrupted by a Target-of-Opportunity or another override observing program, you are entitled to payback time. Such compensation for time lost during your allocated observing run (whether in visitor or service mode), is claimed back through the submission of Observing Blocks (OBs) using our OB Generator. The observations will be executed accordingly in service mode by staff during Nordice Service nights, and you will be informed by email when observations are made and where to retrieve the data. Using the OB generator to claim payback timeAccess the Observing Block Generator and login to your account, or if you are a new user, please register. When you are logged in, add your proposal for which you claim compensation time. There are help buttons at every level of the OB generator, and you can also get support and give feedback through obsupport@not.iac.es. If you have questions about how to define OBs and/or Observing Sequences, please contact service@not.iac.es. For your OBs to be carried out as compensation for time lost to overrides, please make sure to select OB Group type "Payback". TroubleshootingIf you have ...
If you encounter a fault or a problem with the instrument, the computers or the telescopeduring the night, then fill in a Fault Report. Troubleshooting - NOTCam
AppendixTables for Instrument Settings
Table 1a shows the values of the: field rotation(field-r), instrument-parallactic-angle (i-p-a), ccd probe, focusposition (foc-pos), TV focus (tv-foc), field orientation andcounter weight height (c-w-h) for the different instruments. On the TCS, type thecommand followed by the value, for instance field-r -90. The default focus value stated for NOTCam is for the K band in imaging mode using the WF camera (internal camera focus of 5650).
Table 1b shows the default focus offsets between the instruments.
Commonly Used Instrument Commands
Commonly Used TCS Commands
Tracking of Moving TargetsAt the NOT there are two main modes of tracking a moving object (planet, comet, asteroid, satellite): 1) differential tracking with auto-guiding and 2) differential tracking without auto-guiding. Which of these to use, depends in practice on the target speed and how long the observations take. We have been working with speeds as high as 700"/hour with auto-guiding. Since September 2019 the OB generator allows for non-sidereal tracking. The differential rates are given in the FITS headers in the keywords DTRCK_RA and DTRCK_DE. Differential tracking with auto-guidingIn this mode, the telescope tracking is set to the differential rates, and in addition, the auto-guider is used with the star-box set in motion with the same rates. This works for as long as the box stays within the auto-guider TV-screen (approximately 70" field). When the limit is reached, auto-guiding is no longer working. It is possible to reposition the star-box and guide probe without affecting the telescope tracking, but there is a limit to how many times this can be done before reaching the limit of the available guide probe area. This depends on the RA/DEC rates, the field-rotator angle, and the initial location of the guide star inside the guide probe area. If this happens, you have to repoint to the target again. If your target moves less than 70" over the execution time of your observations, you can relax. If it moves more, you need to keep an eye on the star-box and manually re-position it as described under step 3 below. Both the telescope tracking rate and the box-motion rate are given in RA/DEC coordinates, i.e. dDEC/dt and dRA/dt (in arcsec per hour), and the cos(DEC) correction is taken care of internally by the TCS. (In other words, if your RA-rate is given as dRA*cos(DEC), you have to divide by cos(DEC) before entering its value.)
There is a limit to how many times you can reposition the guide probe due to the limited guide probe area. If this happens, you have to start again from point 1. The telescope resets to the sidereal tracking rates at every new telescope preset/pointing so nothing is needed at the end of the observation. However, for your information, you may stop the differential guiding by tcs.box-motion-stop (or in short on the TCS UIF b-m-sto). This does not reset the telescope tracking rates, and if you wish to stop the differential tracking, going back to normal tracking rates, then on the TCS UIF type set-rate 0 0. Tracking without auto-guiding. Rapidly Moving TargetsFor more rapidly moving targets, use the set-rate command on the TCS to continuously move the telescope from a pre-calculated change in position. RA-rate and DEC-rate as above. In this mode auto-guiding is not used. We are also upgrading the possibilities for very fast tracking (without autoguiding), and the software speed limit has been increased from 17"/s to more than 5000"/s. Observations were made of fast satellites where the RA/DEC rates were updated every second.
For Experts OnlyIf the target has an unknown or rapidly changing motion, you might want to adjust the rate of change in RA and DEC while tracking. Use the set-rate command on the TCS and use command recall with the up/down keys and edit the set-rate.
|
||||||||||||||||||||||||||||||||||||||||||||||||||||||||||||||||||||||||||||||||||||||||||||||||||||||||||||||||||||||||||||||||||||||||||||||||||||||||||||||||||||||||||||||||||||||||||||||||||||||||||||||||||||||||||||||||||||||||||||||||||||||||||||||||||||||||||||||||||||||||||||||||||||||||||||
|

